As a cleaning-obsessed homebody and pet parent, I’ve spent several years investing in high-quality gadgets to keep my home in tip-top shape. Anyone who relates knows a closet filled with the best cleaning products cuts down on chore time (looking at you, Tineco VacMop). Rock star cleaning products also offer peace of mind knowing your gadgets are really deep cleaning the home. During this time, I’ve curated a list of non-negotiable cleaning heroes: Grove Collaborative’s eco-friendly products, an electric spin scrubber for the bathroom, and my new favorite gadget: the Bissell Little Green Machine. Read on for our official Bissell Little Green Machine review.
What is the Bissell Little Green Machine?
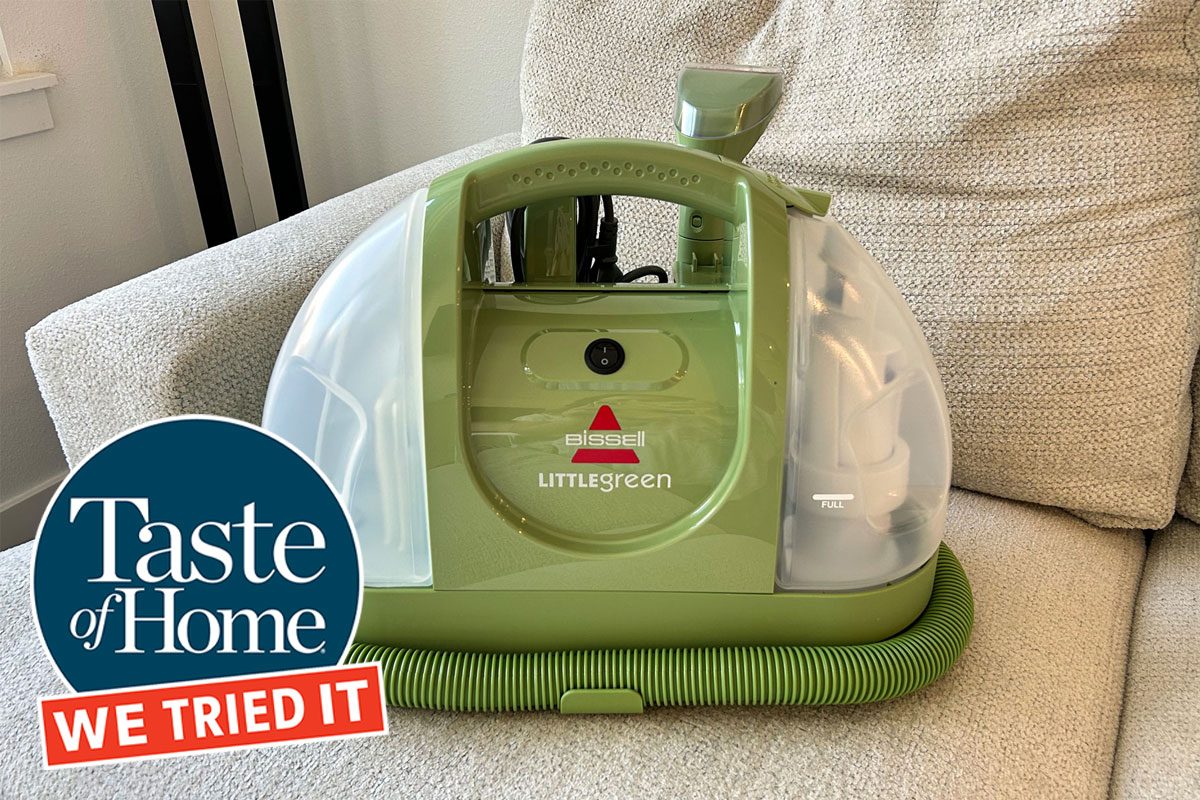
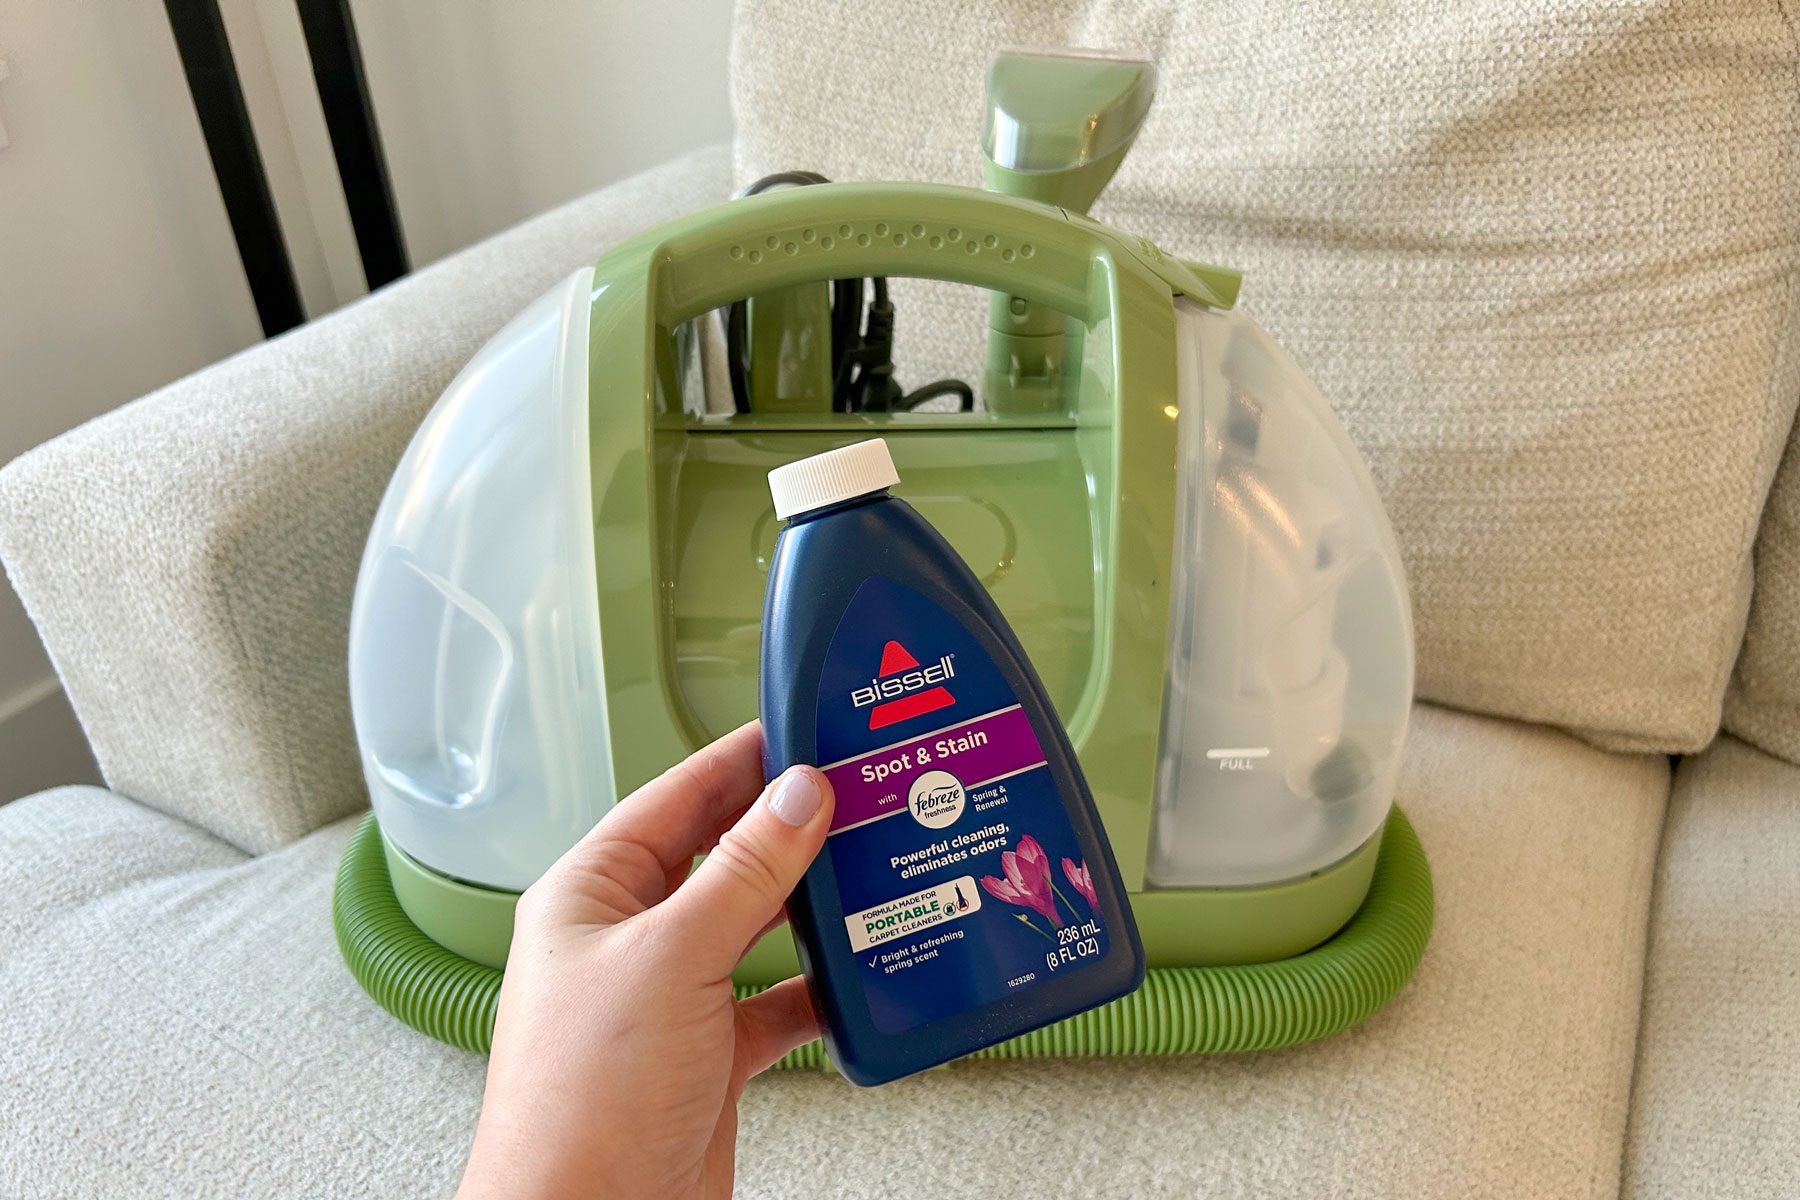
Also known as a portable upholstery cleaner, the Little Green Machine uses wet/dry vacuum technology to eliminate tough stains and spills. I like to call it a magic eraser for couches, car seat cushions and carpets because it makes surfaces look (and feel) brand new. So how does it work? Simply fill the clean tank with water and one capful of the included cleaning solution. Then, plug it in, spray stains with the scrub brush attachment, and vacuum the area in an upward motion to clean. After a few short minutes, stains magically lift away while making surfaces look and smell as fresh as day one. It’s that easy!
Speaking of, you’ll never use a dustpan again after trying a stationary vacuum.
 Via Merchant
We Tried It
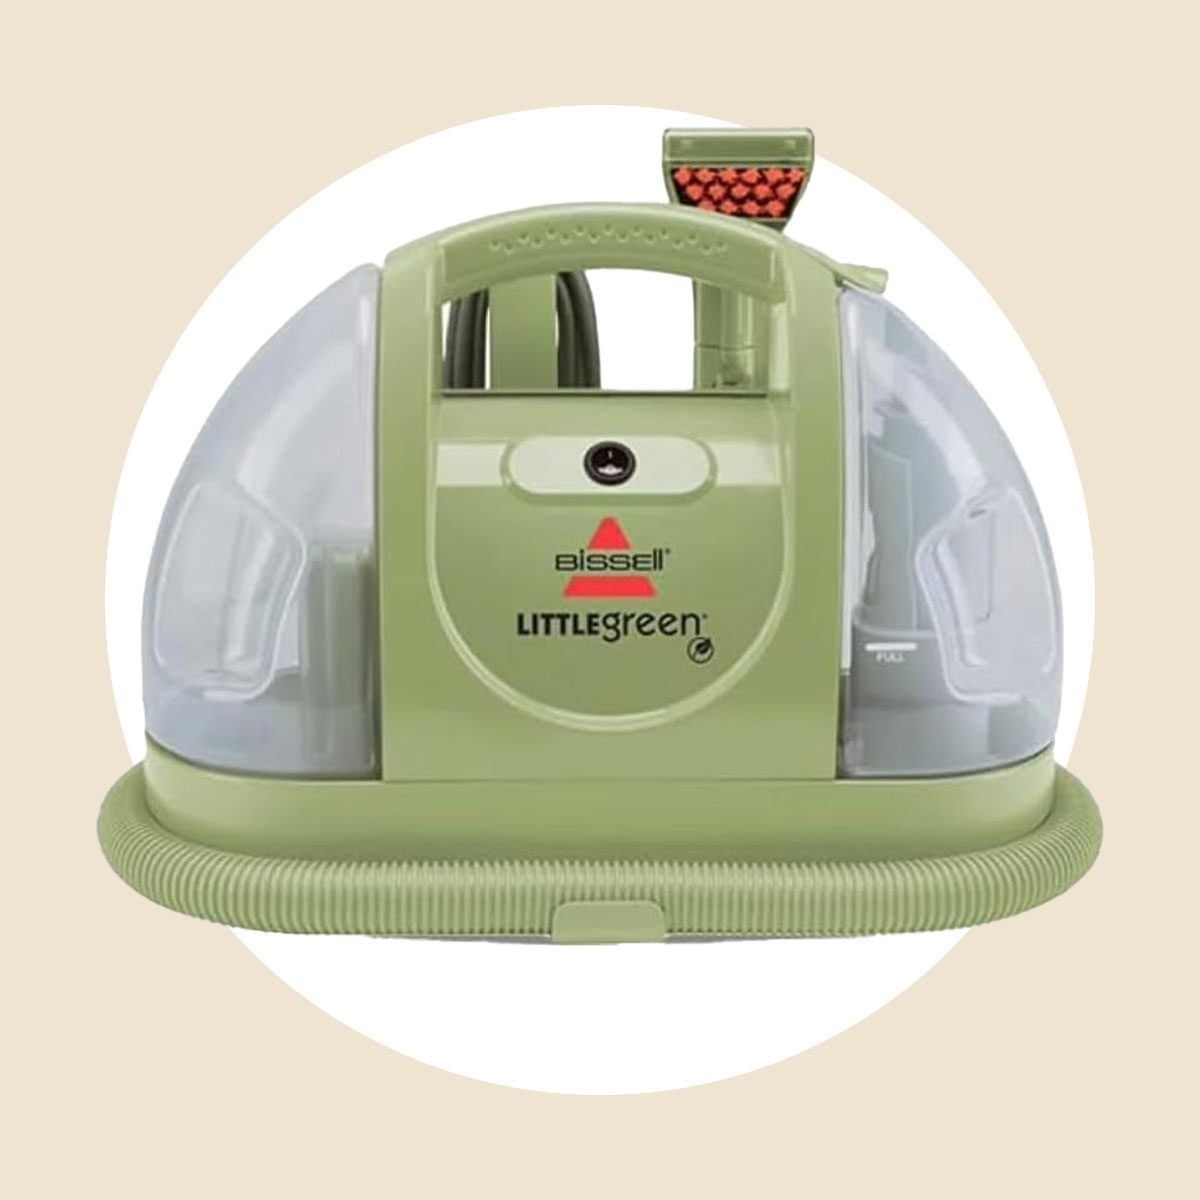
Bissell Little Green Machine
The wet/dry vacuum is like a magic eraser on couch cushions, car seats and carpet.
Bissell Little Green Machine Features

- Portable
- 48-ounce dirty tank capacity
- Includes cleaning solution
- Weight: 10 pounds
- Size: 8.25 x 17.25 x 12.5 (DxWxH)
How We Tested It: Bissell Little Green Machine Review
My initial review began in September 2023. Upon unboxing, my Little Green Machine arrived mostly assembled. A few parts, like the cord holder and spray brush, required manual attachment. The instructions for adding these pieces were simple and took a mere five minutes. Next, I filled the clean tank with water and a capful of the included cleaning solution. All that was left was to plug in the device and press the power button. Time for my Bissell Little Green Machine review!
Couch

To put this gadget to a true test, I spilled black coffee all over my white couch. Risky, I know—but this is the best way to test its limits. I let it sit for 30 minutes, then went in with the Little Green Machine. All it takes is spraying the solution all over the affected area and then working the scrub brush in an upward motion to vacuum. I discovered it’s best to move the scrub brush in multiple angles to clean the entire surface. I followed this process of spraying, scrubbing and vacuuming three to four times before I saw visible results, which is expected based on all the Bissell Little Green Machine reviews I’ve read. Still, in just 10 minutes, my white couch no longer had a black coffee stain. After about an hour of drying, my white couch looked as bright as day one. My initial spilled coffee test proved the Little Green Machine is solid gold.
Carpet

Time for risk number two: dumping orange juice on my carpet. Just like my couch, I let the orange juice stain soak in for 30 minutes. Going in with the machine, I rigorously sprayed the carpet with solution and began vacuuming. Immediately, orange juice started filling up the dirty tank. Cleaning with this gadget is so satisfying and dare I say, fun. Yes, the final result is amazing, but vacuuming is just as delightful because it’s like a magic eraser. The key is numerous sprays and at least five minutes of vacuuming to ensure the stain is lifted from deep within the upholstered surface. After five minutes, the carpet fibers were no longer crusted over with orange juice—and it smelled fresh, too!
Other Surfaces and Messes

As I mentioned, I’m a pet parent. Though my dog, CeCe, is mostly trained, there are always occasional pet accidents. And if they’re on carpet, it can be as long as a few days or weeks until I catch a crusty stain. I’ve tested a lot of pet stain removers, but nothing cleans the carpet quite as well as the Bissell Little Green Machine. If I catch the pet stain immediately, I always treat the area with an enzymatic spray and clean it the next day with the green machine. If it’s an old stain, I immediately go in with the green machine.
I then tested the machine on a recent accident on my bedroom carpet. I’m not exaggerating when I say it could have been there for months before I caught it. Firing up the Little Green Machine, I saturated the area with the solution and vacuumed it in multiple up, down and side-to-side motions. Whiffs of pet urine lifted away as I cleaned the carpet, signaling the machine was deep cleaning the fibers. When I was finished, the dirty tank was a dark brown—aka the sign of the machine’s success. Better yet, my carpet no longer had a layer of yellow crust on the top.
Pros
- Multipurpose portable carpet cleaner
- Eliminates stains on any upholstered surface
- Powerful suction
- Fun to use
- Large dirty water tank capacity means less rinses in between cleanings
- Works on tough pet stains
- Includes cleaning solution
- Removes odors
- One-year limited warranty
Cons
- It’s not cordless
- Must clean the machine immediately after use to avoid odors or malfunctions
- If you want to clean an entire couch or rug, it will take a while, but the results are worth it
FAQ

What is the Bissell Little Green Machine used for?
The Bissell Little Green Machine is a portable wet/dry vacuum that removes stains or spills on upholstered surfaces: couches, carpets, rugs, throw pillows, seat cushions, car seat covers—you name it. Any surface with a stain—whether new or five years old—is no match for this gadget.
Does Bissell Little Green leave couch wet?
Because the machine is a wet vacuum, surfaces are left somewhat damp and will need to air dry for at least one hour. The machine combines water and liquid cleaning solution to thoroughly clean couch cushions and beyond, so make sure to suction up every last bit, even after stains are no longer visible, to ensure surfaces dry properly.
What Other Reviewers Had to Say
Five-star reviewer Collin M. writes, “I absolutely love this thing, for certain, it’s simply magic. We had a stain in the house for YEARS that refused to come up no matter what cleaner you used on it, and was removed in a couple minutes with this bad boy. The water that came up from that old stain was so dark it was disturbing, haha. The only problem now is that the spot where the stain was is now so clean that it makes the rest of the carpet look dirty, lol. Definitely, 100% would recommend!”
“So, with multiple kittens in the apartment, plus kiddo’s got his dog visiting for a little while, as you can imagine, my poor carpet’s taken quite a beating these last three months,” writes verified purchaser T. Rea Okerberg. “Since I can’t afford to have one of those upright shampooers, not only because of their price tag but because of how bulky they are and I lack the space to store it when it’s not being used, I knew I needed to find SOMETHING that would work. Hello, Bissell Little Green! This little guy is SO strong with its suction, it cleaned the mess up super well, and you can’t even tell where he’d marked!”
Product Comparison
Though the classic Little Green Machine is the most popular portable carpet cleaner Bissell offers, it’s not the only one. The brand offers several more portable carpet cleaners like the Pet Pro Portable Carpet Cleaner, Cordless Little Green Machine (ideal for cars or areas where an outlet isn’t nearby), HydroSteam and the ProHeat. These machines are more heavy-duty than the classic model, so it truly depends on how deep of a clean your home or business requires. From my tests, I’ve found the classic Little Green Machine is an ultra-powerful spot cleaner for stains, spills, dirt and grime produced by humans or pets. It also works wonders cleaning entire couches and rugs, just note it requires a little more manpower and patience.
For pet parents, Bissell’s Little Green Pet Pro line is ideal for homes with multiple furry friends who frequently have accidents or get dirt on upholstery. The machine’s technology is specifically designed for big pet messes, making it a saving grace in the event of serious pet accidents. If your pets are small or their accidents are rare, the classic Little Green Machine cleans just as well.
Choosing a portable carpet cleaner comes down to personal preference. The HydroSteam and ProHeat models have heat technology and additional tools that permanently remove stains and deep-clean fibers. Rest assured that no matter what model you choose, upholstered surfaces are guaranteed to get a serious deep clean.
Final Verdict
If you can’t tell by now, my Bissell Little Green Machine review proves this cleaning device is solid gold. I found it takes a healthy amount of spraying and vacuuming to truly eliminate stains. Because it’s a wet/dry vacuum, surfaces are wet post-vacuuming. Be patient if the upholstered item isn’t in A+ condition right away. It’s also important to vacuum every last bit of liquid or else surfaces won’t dry properly. Still, cleaning with the machine is as easy as spraying, scrubbing and vacuuming to transform any upholstered surface. The bottom line: any home with kids, pets or everyday stains they can’t seem to remove can benefit from the Bissell Little Green Machine.
Where to Buy the Bissell Little Green Machine
Via Merchant
We Tried It
Bissell Little Green Machine
The wet/dry vacuum transforms surfaces to like-new condition.
If you have kids, pets or can’t seem to avoid messy spills (aka literally everyone), take our Bissell Little Green Machine review as your sign to add the grime-busting pro to your cart. Find it on Amazon, the Bissell website, Walmart and Target where it goes for around $123.
Considering it revives any upholstered surface (couch cushions, car seats, rugs—you name it) back to like-new condition, it’s one of the best cleaning gadgets to have in your back pocket when serious messes occur. Not to mention it’s a much more affordable alternative to hiring a professional cleaner. If you need me, I’ll be freshening up the couch with this fun gadget!
Next, check out the Bissell Steam Shot for hard-to-reach cracks and crevices.
Favas are a fascinating member of the pea family that inhabit a space halfway between pea and bean. In fact, favas are often known as the broad bean, and have a bright green exterior. The color of the fava is undeterred by a quick steam, and favas are fabulous raw, cooked or as a crunchy snack.
What are fava beans?
Favas, or broad beans, are typically a large, green podded bean that grow on thick stalks. Though thought of as a spring crop, favas are so sturdy and resilient, they are often grown year-round. Fava beans have an exterior skin that must be removed from the fresh bean before eating, which is why many people skip fresh favas (a mistake) and use canned favas instead.
Canned fava beans are a bit tough to find, though they certainly exist. These will be processed, meaning they are both cooked and have been shorn of their outer skins, and are best used for blended preparations such as dips. In late spring and early summer, look for fresh favas at the farmers market. Off-season, favas are most likely to be found dried, where they take on a mildly shriveled, brown appearance.
What do fava beans taste like?
Fresh favas are crisp and mild, with a buttery, creamy texture and a hint of nutty flavor. The fresher the fava, the milder it will taste, so dry favas tend to have a slightly stronger flavor.
How to Eat Fava Beans
Favas can take on any flavor and make great vegetarian snacks. They pick up dusting powder really well, whether salt and pepper or wasabi. Favas only need to be cooked quickly, but doing so brightens the green color, and makes the beans silky soft.
Fresh favas are notorious for requiring some work to harvest the tender beans from their skins. First, release the beans from their pods. You’ll find a translucent skin on the bean, but a paring knife or fingernail easily pierces it, and allows you to peel it off.
Dried favas have the same skin. A simple soaking will loosen up that skin so it may be removed and then the beans are ready to be cooked, which will bring them to life.
Almost any recipe with chickpeas could use fava beans instead. This includes bean salads and dips, as well as air-fried fava beans!
While fava pods aren’t edible, the green, leafy tips of fava bean stalks are. Tender and herbaceous, they lend themselves to stir-fries or soups like hot pot.
How to Store Fava Beans
Fresh fava beans should be stored in the refrigerator and used within a few days. To dry your own favas, remove the beans from the shell and allow them to dry out completely using a dehydrator on low or an oven. This process must be done as slowly as possible to eliminate the fava from cracking in half, as favas hold a lot of moisture. Dried favas should be stored in jars or other airtight containers, away from bugs and moisture.
Home, home on the range, where the steaks are juicy and eaten straight from the bone. OK, those may not be Neil Young’s exact lyrics, but I think cowboys past and present would appreciate the authenticity of my improvised verse.
Whether you’re a real cowboy or merely a fan of rustic, homestyle cuisine, Ree Drummond’s Pioneer Woman cowboy steak recipe is for you (as is this Pioneer Woman pot roast). This monstrous, indulgent steak will feed a crowd and is perfect for your next cookout.
What is a cowboy steak?
If you’re not familiar with a cowboy-cut steak, it’s a special cut of ribeye that got its name from the steak’s popularity among ranchers and cowboys. This bone-in ribeye is typically thicker than a standard cut, usually around 2 inches thick, with more meat included beyond the eye. Often, butchers will also trim some of the exterior fat from the steak as well for a cleaner appearance. (If you can find a cowboy ribeye from a butcher with dry-aged steaks, it’s worth the splurge.)
Another key feature of this type of steak is its Frenched bone (meaning an exposed bone trimmed of all meat and fat) that was originally intended to serve as a handle so cowboys out on the range could eat this cut straight off the bone. However, don’t confuse this cut with its fancy-pants cousin, the tomahawk steak. While similar, a tomahawk ribeye features a longer, Frenched bone with a little extra fat left on the steak.
How to Cook Cowboy Steak Like Ree Drummond
Ingredients
Steak:
- 2 (2-pound) cowboy steaks (about 2 to 2-1/2 inches thick)
- 2 teaspoons kosher salt
- 1 teaspoon ground black pepper
- 1 tablespoon vegetable oil, optional
Ranch compound butter:
- 1/4 cup unsalted butter, softened
- 1-1/2 teaspoons ranch seasoning (e.g., Hidden Valley)
- 1-1/2 teaspoons chopped fresh parsley
Directions
Step 1: Season the steaks
Remove the steaks from the refrigerator and season all sides generously with salt and pepper. Let sit at room temperature for 30 minutes.
Step 2: Prepare the ranch butter
Meanwhile, combine the softened butter, ranch seasoning and parsley in a small bowl until evenly mixed. Transfer the butter to a piece of plastic wrap and roll it into a small log. Refrigerate the compound butter for at least 30 minutes until firm.
Step 3: Sear the steaks over direct heat
Set up your gas or charcoal grill with the coals or flames under one half of the cooking grates so there are two distinct cooking zones. Preheat to medium-high heat (about 400°-450°F) for 15 minutes, then place the steaks over direct heat (the side with the flame or coals). Sear for 3-5 minutes per side until deeply charred grill marks form.
To cook steak in a skillet: Preheat the oven to 375°. Meanwhile, heat a large cast-iron skillet over medium-high heat on your stovetop until very hot. Next, coat the bottom of the skillet with 1 tablespoon of oil. Place one steak in the skillet and sear for 3-5 minutes on each side until a deeply golden crust forms. Then, using a spoon, tilt the pan and remove some of the fat drippings; discard. Reduce the heat to medium and then turn the steak onto its side and sear the fat cap for 1 minute.
Step 4: Move to indirect heat
Transfer the steaks to the indirect cooking zone of your grill (the side with no coals). Cover and cook for an additional 8-16 minutes or until the internal temperature reaches 135° for a perfect medium rare steak. Remove promptly to a carving board.
To cook steak in a skillet: Transfer the skillet to the oven and cook for 8-16 minutes, or until the internal temperature closest to the bone reaches 132° (for medium rare). Remove promptly from the skillet and transfer to a carving board.
Step 5: Top with butter and rest
Top steaks with a generous slice of ranch butter, cover, and let rest for 5 minutes. To serve, carve the steak off the bone and thinly slice it against the grain. Serve immediately.
Editor’s Tip: Don’t be afraid to enjoy as cowboys do and use the bone as a handle to dig right in. Then, pair it with one of these other cowboy-approved recipes.
Here’s What I Thought
Bold, rich, tender and juicy. Need I say more? Ribeyes have always been my favorite cut of steak when I’m looking to treat myself, and this one does not disappoint. While ribeyes are a fattier cut, a ribeye with compound butter adds an extra layer of flavor and indulgence that really is icing on the cake, erm, steer.
I would love to try this recipe with other meat rubs and compound butter flavors in the future. I’ve also recently splurged on a fancy smoker, and I think a reverse-seared cowboy steak is next on my bucket list!
Staring at all the olive oil options at the grocery store gets intimidating. Unlike vegetable oil or canola oil, there seem to be so many brands of olive oil. Then there are the various types: cold-pressed, virgin, extra virgin, refined and extra light.
Which one should you choose?
This golden oil purportedly helps prevent many major diseases and is credited with a variety of health benefits, but much of that can depend on the type of olive oil you buy. Let’s go over the basics of olive oil vs. extra virgin olive oil, and learn when it’s best to choose one over the other.
What is olive oil?
Olive oil is produced by crushing the ripened fruit of the olive tree. Olive trees as we know them date back thousands of years, and historians believe that humans have been making and consuming olive oil for more than 6,000 years. Some fossils suggest that relatives of the olive tree were around millions of years ago. The olive tree is native to Asia Minor but eventually spread across the entire Mediterranean basin. Most of the world’s olive oil is still produced in those regions.
The oil is liquid at room temperature, but solidifies when cold. Olive oil is a crucial component of the super-healthy Mediterranean diet and is one of the primary cooking fats in Greece, Spain and Italy, among other places.
Regular olive oil, which can’t be labelled “virgin” or “extra virgin,” is more refined—aka less flavorful—than virgin oil, and may have been heated during production. It is considered to be a lower grade of olive oil. It can be made using olives that had defects in flavor, but because it is refined, those flavor notes will not be noticeable in the finished product.
What does olive oil taste like?
Regular olive oil will have some of the characteristics of the olives from which it was made, but because of the way the oil is produced, the flavor will generally be comparatively smooth and mild. As the oil is heated and refined, the compounds that give olive oil its unique and interesting flavors are removed.
How do you use olive oil?
Non-virgin olive oil can be great as a cooking oil. It can be used to saute vegetables or in marinades for meats (although virgin oils are great for those tasks too).
There is debate about whether olive oil should ever be used for frying as it has a lower smoke point than peanut oil, canola oil, corn oil and other oils prized for use in super hot applications. A refined olive oil will likely have a higher smoke point than one that is unrefined and will definitely have a higher smoke point than an oil that is unfiltered. To settle any confusion, we have a guide on cooking oils that discusses all sorts of uses and applications.
What is extra virgin olive oil?
Extra virgin is a classification for olive oil that has been produced by cold mechanical extraction—such as by grinding with stones—and without the use of chemicals (some much lower quality olive oils are processed with a chemical treatment).
To qualify as extra virgin, the oil must also receive high marks for its flavor and have a low percentage of free oleic acid. Cold-pressed extra virgin olive oil retains much more of the nutrients that offer the health benefits touted by olive oil. Oil that is cold pressed and doesn’t merit the extra virgin designation can be sold as virgin oil.
What does extra virgin olive oil taste like?
Extra virgin olive oil is made from the same types of olives as regular olive oil, but it’s a grade reserved for the most delicious batches. Virgin oils will taste different depending on the kind or kinds of olives that were pressed to make it and how ripe the olives were at harvest time.
Some virgin olive oils are smooth and buttery tasting, but many have peppery and grassy notes, and will cause a little tickle in the back of the throat. Certain olive oil packages list information about the flavor profile of the oil within.
How do you use extra virgin olive oil?

The top-flight flavor means that extra virgin oil is superb for taste-forward applications such as drizzling over salads or as a dip for breads. Because extra virgin oil is more expensive than its virgin counterpart, budget-conscious cooks might want to save it for times when its flavor will truly stand out. However, if you’ve got cash or you’re budgeting for healthier foods, extra virgin olive oil can be your go-to oil for low to medium temperature cooking.
Extra virgin olive oil is considered one of the healthiest fats. However, because of its robust flavor, olive oil is not an all-purpose oil. If you want the health benefits of olive oil without the zing, it can be combined with neutral or nutty-tasting oils such as sunflower or grape seed.
Solo, olive oil is excellent in Mediterranean dishes such as hummus, pesto and gazpacho. Starchy foods pair well with the oil’s rich and sharp taste, so choose olive oil for tossing with pasta, making pizza dough or as a dip for bread. It is also an important part of the dressing for tabbouleh.
Extra virgin oil can be used in sauces and for cooking in place of regular olive oil, if desired.
Olive Oil vs. Extra Virgin Olive Oil
So, regular olive oil is refined and may be produced using heat. Virgin and extra virgin oil are very similar to each other, but the extra virgin version has the finest flavor.
If you’re a cost-conscious cook, it can be great to use a less pricey oil for pan cooking and in sauces, but keep a bottle of extra virgin olive oil around for use in salad dressings and as a healthy drizzle on top of soups, a dip for bread and so on. Choose virgin olive oil as a middle-of-the-road option for cooking and save the fanciest stuff for special occasions.
If price is no object and you only want to keep one bottle of oil on the shelf, go for the extra virgin. It can be used in all of the same ways as other olive oils, but will be particularly delicious. In addition, extra virgin oil is purported to have the most health benefits.
Don’t forget that some olive oils are buttery and well-rounded, while others are grassy or peppery and piquant. Finding the flavor of olive oil that you like most may be even more important than whether it’s virgin or extra virgin!
Whichever you choose, make sure you store the olive oil properly.
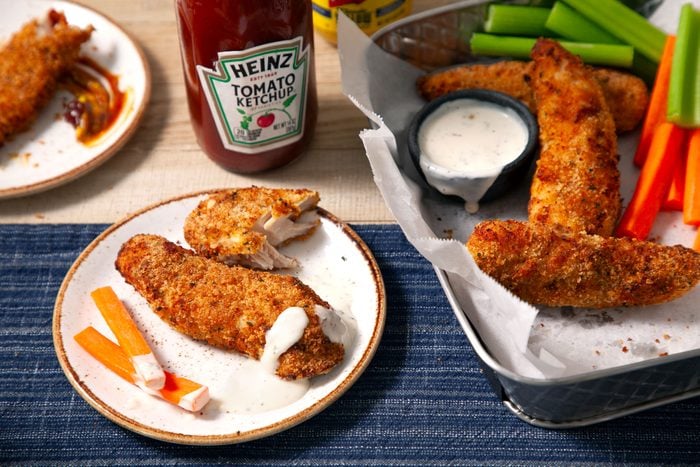
A good chicken tender is defined by two factors: moist chicken and a crackled, crispy exterior that holds on to dipping sauce. In any shape and size, they’ll bring smiles to the entire table—especially when paired with air-fryer french fries. Great for dinner, lunch or a snack, these air-fryer chicken tenders are low-calorie and have less fat thanks to the air fryer.
This is a quick recipe (just 30 minutes!) with little cleanup. Pick out your favorite French fry dip and let’s go!
Air-Fryer Chicken Tenders Ingredients
- Chicken tenderloins: Using only the most tender part of the breast (sometimes called “the nugget”), you have a perfectly sized, moist piece of meat that requires no prep. If you buy extras and freeze them, use ’em up in these other chicken tenderloin recipes.
- Panko bread crumbs: The gold standard of breadcrumbs, panko is made from crustless bread, resulting in large crisp flakes that fry beautifully.
- Garlic powder: For a more evenly flavored coating, use garlic powder instead of minced garlic cloves.
Air-Fryer Chicken Tenders Recipe
Ingredients
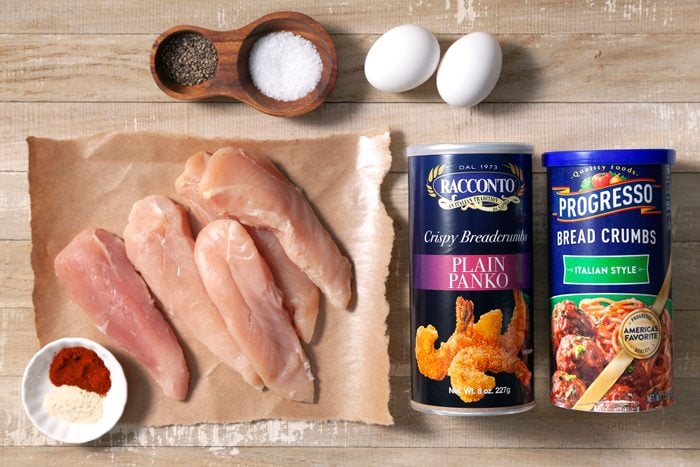
- 1 pound chicken tenderloins
- 3/4 teaspoon salt
- 1/4 teaspoon pepper
- 1/2 cup panko bread crumbs
- 1/2 cup seasoned bread crumbs
- 1/2 teaspoon garlic powder
- 1/2 teaspoon paprika
- 2 large eggs, room temperature
Directions
Step 1: Prepare the air fryer
Set the air fryer to 400°F and allow it to preheat as you prepare the chicken.
Step 2: Prepare the chicken
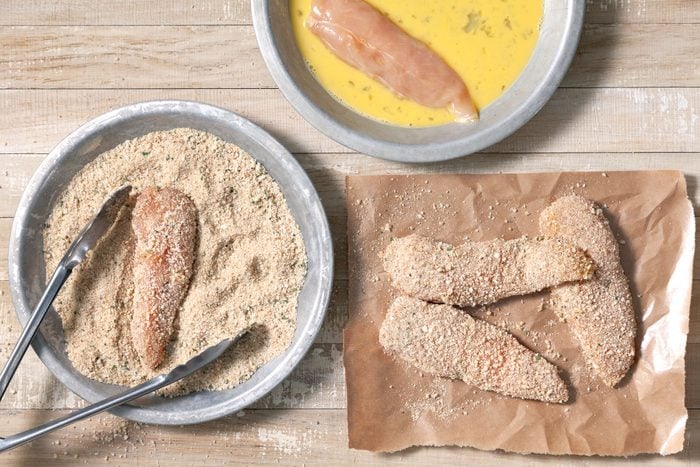
Sprinkle the chicken with salt and pepper, set aside.
Set up three bowls. In the first bowl, combine the bread crumbs, garlic powder and paprika. In the second bowl, whisk the eggs really well until completely incorporated. Leave the third bowl empty.
Using your less dominant hand, dip a chicken tender into the egg wash, shake it off and then place into the bowl with the bread crumbs. Use your dominant hand to toss additional breadcrumbs from the bowl on top of the tender, and then lightly press them onto the chicken so they adhere. Place the chicken in the empty dish at the end and start again.
Editor’s Tip: By only using one hand to handle the raw chicken and egg, the other remains clean and able to toss the breadcrumbs easily.
Step 3: Fry the chicken
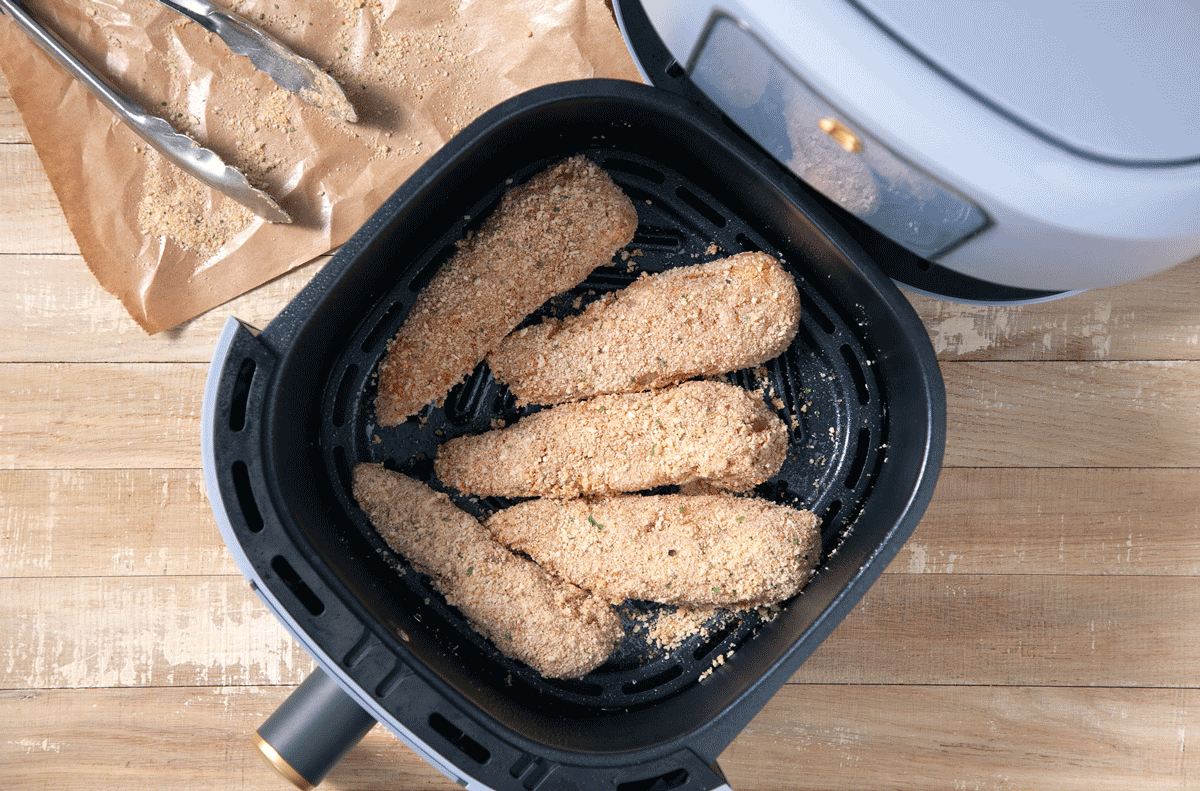
Place the chicken in a single layer on a greased tray in the air-fryer basket. Spray the top of the chicken with cooking spray. Cook seven to eight minutes before flipping the tenders over and repeating on the other side. The goal is a golden brown coating and no pinkness left in the chicken. If you test a tender and find pinkness, return the tenders to the fryer for another one to two minutes per side.
Recipe Variations
- Add cheese: Add Parmesan to the chicken breading for a cheesy, umami-rich way to elevate a simple tender.
- Spice things up: Cajun chicken tenders give the nuggets a kick of heat when you’re looking for a little something extra. Simply add homemade cajun seasoning to the bread crumb mixture.
- Get saucy: Finger-licking good tenders could always use some hot sauce to heat things up (these are our favorite hot sauce brands to stock up on). Air fry the chicken tenders as normal and then coat them in sauce. Serve with plenty of napkins!
How to Store Air-Fryer Chicken Tenders
To keep your chicken tenders crispy and fresh, layer them in airtight containers with paper towels between the layers. They’ll last four to five days in the refrigerator. When ready to eat, simply reheat them in the air fryer for two to three minutes per side to recrisp the breading.
How to Freeze Air-Fryer Chicken Tenders
Making a big batch of tenders makes the most sense, so you can always have them on hand for a snack or when a surprise guest shows up. To freeze, lay your tenders on a cookie sheet lined with parchment, uncovered, and then place in the freezer. When the tenders are completely frozen, which should take five to six hours, place them in a large resealable bag. Remove as much air as possible from the bag.
You don’t need to defrost your tenders when you’re ready to heat them up; simply turn your air fryer to 400°, and once ready, place your tenders back into the air fryer in a single layer and cook for eight minutes. You don’t even need to flip them! Do not remove the tenders once the time expires; leave them in the basket for an additional five minutes to heat through.
Tips for Making Air-Fryer Chicken Tenders
How can you make sure the air-fryer chicken tenders are crispy?
The key to crispy tenders is removing all moisture. The chicken should be dry before it goes into the egg, and your panko should also be dry. You can let the tenders dry out further by placing the plate with the raw, breaded tenders in front of a fan for five minutes. As long as the air-fryer is set to the right temperature, and you spray the basket and top of the tenders with cooking spray, they should get crispy.
What can you serve with air-fryer chicken tenders?
With chicken tenders, the name of the game is dipping sauce. You can lean into a homemade ranch dressing or barbecue sauce of any variety. And you could always try something different like a peanut butter dipping sauce. While it may sound simple, a really delicious homemade ketchup can be a surprisingly comforting choice too. Besides sauces, a crudités platter, air fried vegetables or even a french fry charcuterie board are great things to serve with chicken tenders.
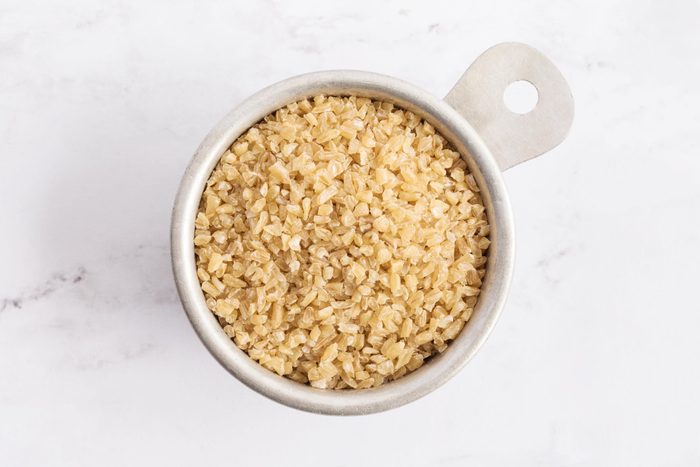
Bulgur has a long history in Middle Eastern, North African and Eastern European cuisines, and has become popular relatively recently in other parts of the world. Once you know what bulgur is and how to cook it, you’ll be tempted to add it to your lineup of healthy whole grain options.
Full of flavor and nutrients, this wheat-based grain can introduce you to a world of traditional dishes from other cultures or stand in for rice or couscous in favorite recipes.
What is bulgur wheat?
Bulgur starts as whole, raw, hulled wheat kernels, often called wheat berries or groats, that are parboiled, dried and ground into several sizes. This makes bulgur wheat distinct from milled, yet still raw, cracked wheat. Like parboiled rice, bulgur cooks relatively quickly, but it remains packed with fiber and nutrients.
Sometimes spelled bulghur, the dry grain may be red or white, depending on the wheat variety used. More important than the color is the grind, especially when deciding how to use this grain. Just keep in mind that bulgur is not gluten-free.
Are there different types of bulgur?
Bulgur grinds range from fine to extra coarse, with each type requiring more heat and time to cook completely. Finely ground bulgur can be soaked in a little hot water, so it’s sometimes called quick-cooking bulgur. You can still soak a medium grind, but it takes a bit longer and will be chewier than cooking it on a stovetop. Coarse and extra coarse bulgur are best cooked unless you like an ultra-chewy texture.
The grind might not be listed on packaging or bulk bins, although some companies specify the grind on their website. Fine bulgur looks a lot like couscous when dry and, once cooked, shapes well into balls, molded salads and kibbeh. Medium bulgur is the most common type; use it if the recipe doesn’t specify the grind. About the size of sesame seeds, a medium grind works particularly well when stuffing peppers or grape leaves but has all-around uses in side dishes, salads (like tabouli) and grain bowls. Coarse and extra coarse grinds, in nearly whole kernels, are best in a hearty pilaf or cooked into soup.
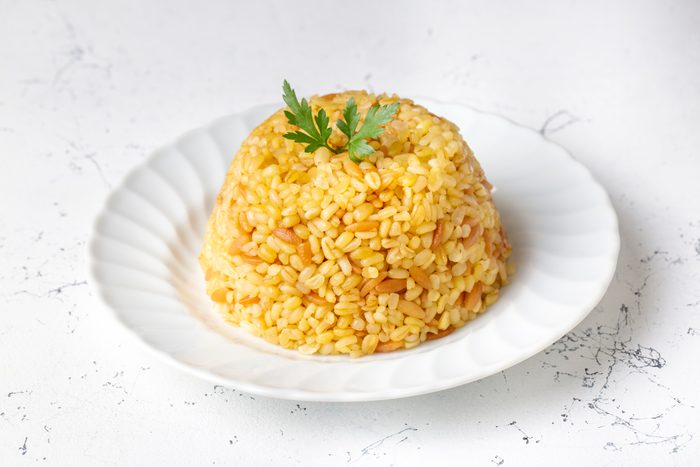
How to Cook Bulgur Wheat
To cook bulgur, simmer the grains on the stovetop or soak them in hot liquid. The coarser the grind, the longer it takes. Soaking in hot liquid keeps the grains well separated but is most effective with fine- and medium-grind bulgur. Instead of water, try vegetable or chicken stock, milk or coconut milk for more flavor. Plan on about 1/4 cup of dry bulgur per serving.
Cooking bulgur
Step 1: Simmer the bulgur
In a small saucepan, bring 2 cups of water to a boil. Add 1 cup of bulgur, stir briefly and cover. Reduce the heat to a simmer and cook until tender, checking after about 10 minutes for fine bulgur. Add 5 minutes for each increase in coarseness; add a splash of hot water as needed to keep the bulgur from sticking.
Editor’s Tip: Bulgur can also be cooked instead in a rice cooker on the white rice setting or in a pressure cooker.
Step 2: Drain and fluff
When fully cooked, remove the saucepan from the heat. Drain off any excess liquid; use a fork to fluff the bulgur. Cover loosely with a kitchen towel and let sit for five to 15 minutes before fluffing again and serving or using in a recipe.
Soaking bulgur
Step 1: Prepare the bulgur
In a heatproof bowl or pan, combine 1 cup of bulgur with boiling water, using 1 cup water for finely ground bulgur and 2 cups water for coarser grinds. Cover with a lid.
Step 2: Soak and drain
Let the bulgur sit in the hot water until tender; this might take 10 minutes for fine bulgur and up to an hour for coarse bulgur. Drain off any excess liquid, fluff with a fork and serve.
How to Serve Bulgur
Traditional Middle Eastern recipes that use bulgur include salads, pilaf, stuffed vegetables and dishes that shape cooked bulgur, often mixed with beans or lentils, into balls or patties. Bulgur can find its way into plenty of nontraditional dishes, too. Consider bulgur alongside a main dish of chicken or tofu and roasted vegetables or as the base for a Mediterranean bowl. Slip bulgur into a fusion recipe like chicken Greek salad, vegetarian enchiladas or a hearty jambalaya.
What does bulgur taste like?
Bulgur has a light nutty flavor and retains a slightly chewy texture even when fully cooked. It has more flavor on its own than many other grains but remains mild enough to blend with a range of ingredients in sweet or savory dishes. Cook it in milk with a little cinnamon and then stir in honey for a sweet base, or simmer in vegetable, mushroom or chicken stock for savory recipes.
The taste and texture of bulgur make it a popular ground beef replacement in vegetarian and vegan chili (like this bean and bulgur chili), but it can also be served alongside meat instead of rice or another starch.
How to Store Bulgur Wheat
Keep dry bulgur in its original packaging or in an airtight container. Store in a dry place at a cool room temperature.
Cooked or soaked bulgur will last for up to four days in the refrigerator or three months in the freezer. Once tender, fluff the bulgur and let it cool completely before transferring it to an airtight container for storage. It can be used chilled, at room temperature or reheated with a splash of liquid over low heat on the stovetop or in the microwave.


Your speedy standby could earn you $500! Share your quick entrees, five-ingredient mains and make-ahead meals and you may end up on top. Do you beat the clock with recipes relying on jarred sauces, frozen veggies or refrigerated dough? Send those half-homemade suppers and any shortcut staples that make work nights simply delicious. Slow-cooked, air-fried and pressure-cooked dishes count, too, so submit your best. From beef, chicken and pork favorites to fish, seafood and plant-based specialties, any time-saving dish could land you the grand prize!
See Our Newest Recipe Contest Winners


Next Up: Check out more Taste of Home contests and winning recipes.
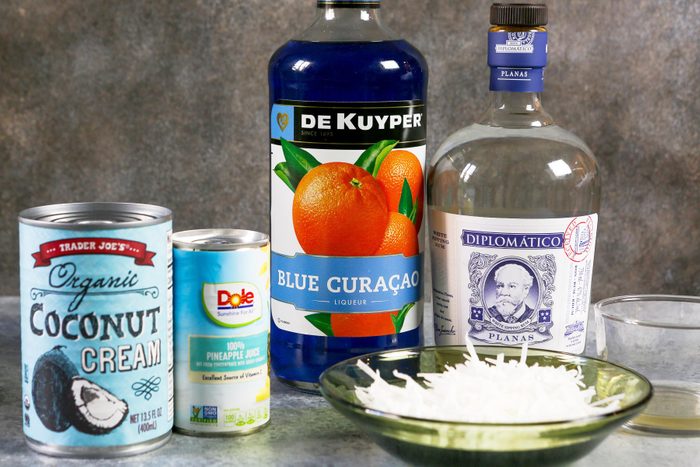
A Jack Frost cocktail is the perfect thing to sip on during the holidays, especially when you’re munching on coconut rum balls or rum brickle bites. It looks wintry with an icy blue color and snowy coconut rim but tastes like the beach. It’s the definition of a tropical heat wave in December! Made with white rum, blue curaçao pineapple and coconut, this is a fun alternative to classic pina coladas.
If you’re investing in blue curaçao for the first time, have no fear, there are tons of ways to use it. I like to whip up Caribbean blue margaritas or blended blue lagoon margaritas.
How to Make a Jack Frost Cocktail
This recipe makes one cocktail.
Ingredients
- 2 ounces white rum
- 1-1/2 ounces pineapple juice
- 1 ounce blue curaçao
- 1 ounce canned coconut cream or canned coconut milk
- 1/4 ounce simple syrup, plus more for rimming glass
- Shredded unsweetened coconut, finely chopped
Directions
Step 1: Combine ingredients
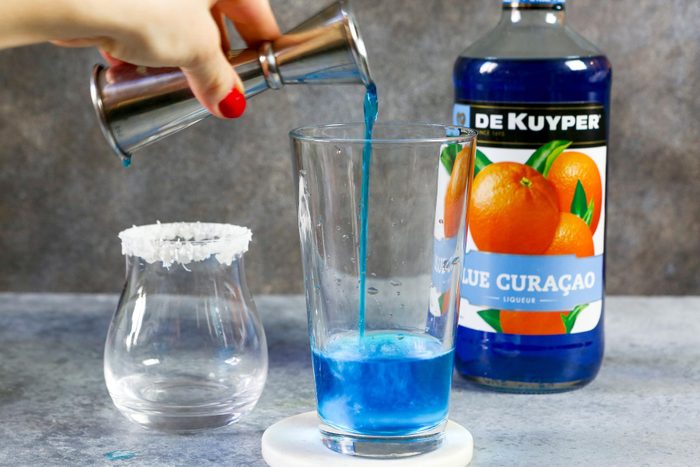
Add rum, pineapple juice, blue curaçao, coconut cream and simple syrup in a cocktail shaker partially filled with ice.
Step 2: Shake cocktail to chill
Secure the cocktail shaker lid and shake vigorously for 20 seconds until cocktail is chilled.
Step 3: Rim glass
Dip the rim of a rocks glass in simple syrup, then dip the rim in shredded coconut. Fill the rocks glass with ice.
Step 4: Strain and serve
Strain the cocktail into the prepared glass and serve.
Can you make a nonalcoholic Jack Frost cocktail?
The cocktail is best when made with the ingredients listed above, but if you want to try making this nonalcoholic, there are a couple options! You could swap the rum out for a nonalcoholic clear spirit. There are quite a few zero-proof brands out these days—try Lyre’s or Ritual.
And instead of the blue curaçao, use a dash of butterfly pea flower powder mixed with a bit of orange juice. The powder is similar to matcha powder and comes from the butterfly pea plant. Its deep blue hue flavored with orange juice should achieve a similar color to blue curaçao and still create a tasty mocktail.
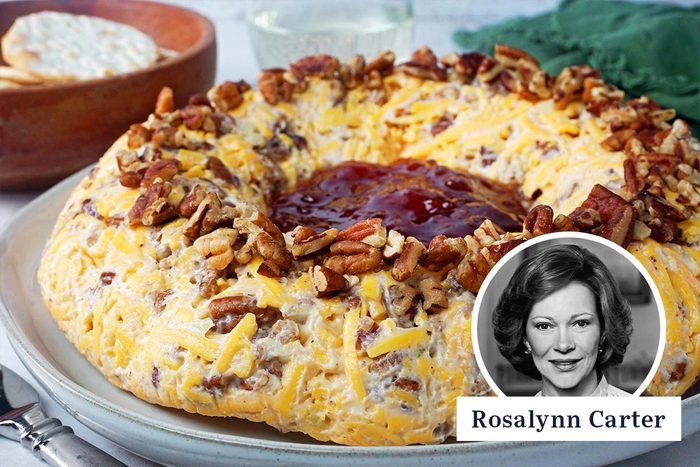
As first lady to President Jimmy Carter, Rosalynn Carter was a champion for the performing arts, an advocate for mental health and a devoted wife.
While Mrs. Carter’s professional legacy will always be the activism and philanthropy she performed alongside her husband, her memory also lives on through the recipes she shared from her ’70s kitchen. This Rosalynn Carter cheese ring recipe is one of two recipes (her strawberry cake is the other) that were shared by the U.S. National Archives after her passing at the age of 96.
We are honored to share her recipe here. It’s an easy recipe that’s perfect for potlucks, holiday celebrations or any time you’re looking for a vintage recipe that will transport you back in time.
‘Plains Special’ Cheese Ring Recipe
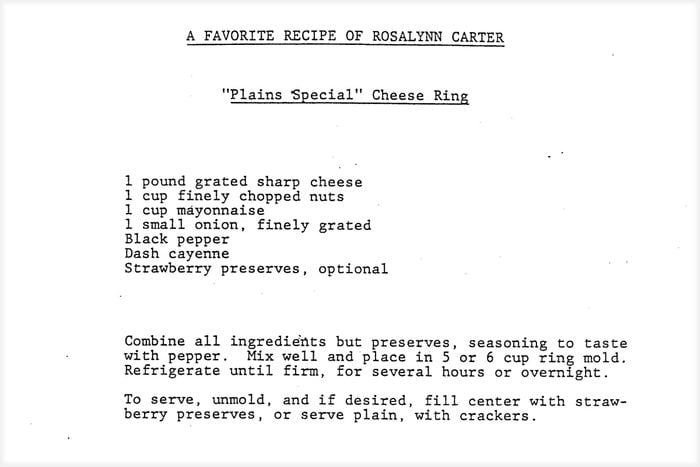
Ingredients
- 1 pound sharp cheese, grated
- 1 cup pecans, finely chopped
- 1 cup mayonnaise
- 1 small onion, finely grated
- Black pepper
- Dash cayenne
- Strawberry preserves, optional
Directions
Step 1: Combine savory ingredients
In a large mixing bowl, combine all ingredients except the strawberry preserves. Mix well and season to taste with pepper.
Editor’s Tip: Grate the cheese fresh off the block for this recipe. It makes a world of difference!
Step 2: Chill
Transfer the mixture to a 5- or 6-cup ring mold. Cover with plastic and chill in the refrigerator until firm, for several hours or overnight.
Editor’s Tip: For easy unmolding, line the mold with plastic wrap or try these other tips for making a perfect mold.
Step 3: Serve
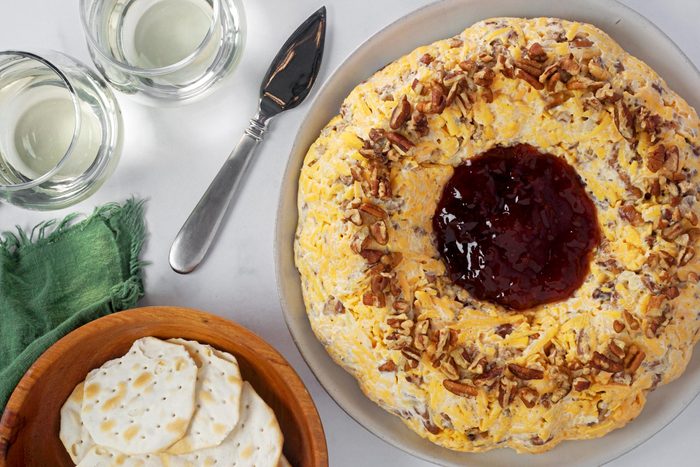
To serve, carefully unmold the cheese ring to a plate, and if desired, fill the center with strawberry preserves. Enjoy with your favorite assortment of crackers.
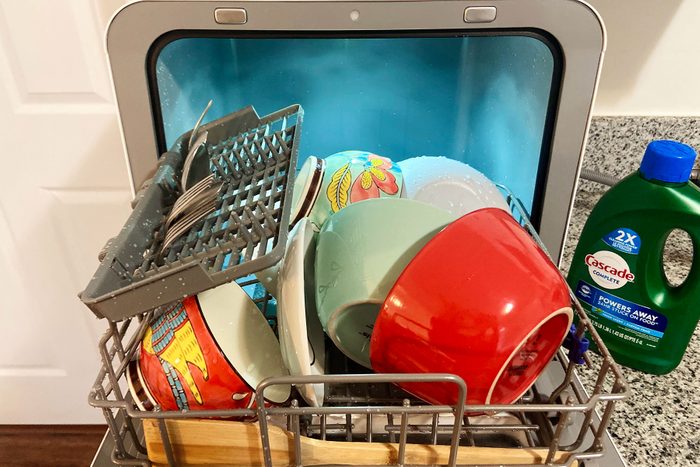
No chore makes me feel like Sisyphus quite like dishwashing does. The last time I lived in an apartment with a dishwasher was nearly four years ago, so it’s been a life of hand-washing and pruney fingers for a while now. And because I work from home and cook three square meals in my kitchen each day, the plates, bowls and silverware pile up at warp speed. Even with my trustiest dishwashing tools on hand, the task is so monotonous.
Unable to look at one more food-crusted fork, I was desperate for a solution. Enter: the countertop dishwasher. I jumped at the chance to test out the popular Farberware model, but would the appliance make my life easier, as I’d hoped?
What is the Farberware Countertop Dishwasher?
This Farberware dishwasher is an appliance that sits on a surface such as a table or countertop and simply plugs into a wall. Because of this, its capacity is significantly smaller. The machine can fit just a few place settings at one time and holds dishes with a 12-inch diameter or smaller. The overall footprint is 22 by 20 by 17 inches, and it weighs 43 pounds.
The Farberware countertop dishwasher is intended for those who live in RVs, dorms, studios or other small apartments. Regardless of location, it’s best for one- or two-person households. (Psst! See more small appliances.)
 VIA MERCHANT
We Tried It
Farberware Countertop Dishwasher
The compact dishwasher has wash programs that leave your dishes clean and you with more free time.
Farberware Countertop Dishwasher Features
I’ve compared various countertop dishwasher models, and in my opinion, the Farberware one has all the essential features. For one, it doesn’t require a faucet hookup. Although that option is available, the 5-liter tank may also be filled manually with the provided pitcher before each use, making the machine extra versatile and portable. In addition to the pitcher, the dishwasher also comes with a rolling rack, clip-on silverware tray, baby bottle holder, drain hose and faucet supply line. Note: I did not receive the fruit basket that’s currently available.
Moreover, there are various functions: normal, rapid, glass, fruit, baby care and air refresh. Although I haven’t had the use for most functions, I’ve noted that the normal cycle, which takes just over two hours, includes drying, whereas the 40-minute rapid cycle does not. I much prefer the former. I use liquid dishwasher detergent, but pods work, too.
When you’re all set, the door latches via magnetic strips, plus it has a window so you can follow along with the progress (my cat is a big fan of this feature!).
How We Tested It
Set-Up
I’ve used the Farberware countertop dishwasher almost daily for three months. Assembly upon reception was effectively nonexistent because I didn’t hook it up to our faucet right away. All that was required was unpacking the accessories, which were neatly situated within the rolling rack; connecting the drain hose to the back of the machine, then snaking it into a nearby sink; and plugging the dishwasher into the wall.
For the first two months, I manually filled the water tank via the provided plastic pitcher. Although this method makes the dishwasher more universally usable, it does get old after a while. The pitcher holds less than two liters of water, so it requires three trips to fill the tank. Plus, the opening to the cavity in which you pour the water is small and lends itself to spillage.
That being said, the dishwasher was convenient enough to make these gripes worth it. I didn’t fall in love with the appliance, however, until I hooked it up to my kitchen faucet. If this is an option for you, I’d highly recommend it. It makes me feel like I have a standard dishwasher at my service.
Use
I most often employ the rapid and normal cycles. The rapid cycle takes under an hour, but the water doesn’t get as hot and the dishes aren’t dried. The normal cycle is lengthy, but I typically do dishes right before bed, so I don’t mind it running throughout the night to have mostly dried dishes in the morning. While running, it’s surprisingly quiet, and the alarm that sounds upon completion isn’t overly disruptive. The normal cycle takes two hours and 10 minutes, and temps reach well over 150 degrees.
On those lighter days in which I’m not meal-prepping and creating tons of dirty pots and pans, the dishwasher holds roughly an entire day’s worth of plates, bowls, cups and cutlery. The silverware rack, especially, fits a surprising amount.
After I’m done loading the rack, I squeeze a dollop of liquid detergent into the designated compartment on the backside of the door and let it do its thing. I typically have a few additional dishes to take care of by hand, like those that aren’t dishwasher-safe or are too big. But, in all, I’d say the Farberware dishwasher cuts the amount of time it takes me to do my dishes in half.
I’ve never had any issues with stuck-on food (granted I do thoroughly rinse dishes before adding them to the dishwasher). There have been instances, though, of small amounts of dried coffee and melted cheese readily washing away. It does a bang-up job that’s comparable to that of any full-size dishwasher.
Pros
- No hookups required
- Included accessories (water pitcher, baby bottle holder, fruit colander)
- Easy touchscreen with five wash programs
- Drying capabilities
- Sleek appearance with see-through window and LED lights
- More compact than most other models
Cons
- Not compatible with rinse aids
FAQ
How much water does a Farberware countertop dishwasher use?
The Farberware countertop dishwasher uses 5 liters of water per wash cycle, regardless of the program selected. It will need to be filled, either manually or via the faucet supply line, each time you use it. This compares to the 4 to 14 gallons of water used by full-size dishwashers (granted, they are cleaning more dishes). Additionally, hand-washing dishes can use as many as 27 gallons of water per full-size dishwasher load.
How does a countertop dishwasher drain?
This Farberware countertop dishwasher, specifically, drains by way of a hose, which screws and clamps onto the back of the machine. It’s more than 50 inches long, so the dishwasher does need to be somewhat close to a sink, but it’s bendable and inconspicuous to make the connection more manageable. The hose is also fitted out with a suction cup so that it can be secured in place to the wall or base of the sink.
Product Comparison
As I mentioned, I believe the Farberware countertop dishwasher to have the best parts of all its competitors. For example, it doesn’t require a faucet hookup like some others. It has drying capabilities, which not all can boast. And its wash programs and accessories are on par. Additionally, it’s similar in size to or smaller than other models, like, say, the Black+Decker one. Most countertop dishwashers cost between $200 and $500. At $280, this Farberware dishwasher is solidly in the middle. Plus, its touchscreen, windowed door and overall sleek design make it more attractive than most.
As compared to standard dishwashers, it’s, of course, cheaper, but it’s also much smaller. Standard dishwashers can clean more than a dozen place settings at one time, whereas the Farberware countertop dishwasher can only handle two or three. That being said, the Farberware model is not meant to take the place of a standard dishwasher but rather serve as a shortcut solution for those who don’t have access to or the means for one.
Final Verdict
Not to sound dramatic, but I don’t want to remember a time before my Farberware countertop dishwasher. In a perfect world, it would probably hold more dishes and dry them slightly more effectively, but the appliance has made a dreaded daily chore far less burdensome. It’s such a relief to have a place to toss things like coffee mugs, small cutting boards and cooking utensils where I know they’ll be cleaned thoroughly and quickly.
If you can hook up the dishwasher to your faucet, I’d recommend this to anyone who might think that have a use for it, whether they’re a college student, RV-dwelling retiree or young urbanite. If you only can fill it up manually, I’d first gauge how much you dislike doing dishes before adding it to your cart because, truthfully, it might not save you much overall time, more so the need to get your hands dirty.
Where to Buy the Farberware Countertop Dishwasher
VIA MERCHANT
We Tried It
Farberware Countertop Dishwasher
The Farberware countertop dishwasher fits atop most kitchen surfaces and washes dishes like its full-size counterparts.
The Farberware countertop dishwasher is available from Amazon, Home Depot and Wayfair for $280. If you like to spend your time in the kitchen cooking rather than cleaning, then this appliance is the sidekick you need.
You won’t be able to resist this easy recipe for English custard tarts. Start by making a simple homemade shortcrust pastry, then fill it with a rich and creamy custard. Nutmeg on top adds a cozy, comforting aroma. It’s the ultimate treat for afternoon tea or dessert after Sunday dinner.
What is an English custard tart?
Custard tarts are traditional British desserts that have been part of the cuisine since at least the Middle Ages, and they’re enjoyed by everyday citizens and royalty alike. They’re made of shortcrust pastry with a creamy egg custard filling and dusted with nutmeg. They can be made as small, bite-sized tarts or larger tarts for slicing and sharing, like a classic treacle tart.
English Custard Tart Ingredients
- Eggs and egg yolks: The filling of an English custard tart is made with an egg custard, so you’ll need whole eggs and egg yolks to add richness. Including the whole eggs will give the custard a bit more stability as it bakes.
- Half-and-half: The custard filling is creamy but light, so half-and-half will be your best bet for the right consistency.
- Butter: Melted butter is an essential ingredient in both the short-crust pastry and the custard. It will create a flaky texture in the crust, and help to keep the filling nice and smooth.
- Nutmeg: Nutmeg is the classic topping for an English custard tart.
English Custard Tart Recipe
This recipe is for a single, large tart that serves six and was contributed by Community Cook Teri Rasey-Schloessmann from Tulsa, Oklahoma.
Ingredients
- 1-1/2 cups all-purpose flour
- 2 tablespoons sugar
- 1/2 teaspoon salt
- 1 large egg, beaten
- 1/4 cup butter, melted
- 2 tablespoons half-and-half cream
Custard:
- 2 large eggs, plus 4 large egg yolks, room temperature
- 3 tablespoons sugar
- 1 tablespoon plus 1 teaspoon all-purpose flour
- 1-1/3 cups half-and-half cream
- 4 tablespoons butter, melted
- 1/8 teaspoon ground nutmeg, optional
Directions
Step 1: Mix dry ingredients for the crust
Preheat oven to 400°F. In a large bowl, combine the flour, sugar and salt.
Step 2: Mix wet ingredients for the crust
In a small bowl, whisk the egg, melted butter and half-and-half cream until fully incorporated.
Step 3: Make the dough
Gradually add the egg mixture to the dry ingredients, tossing with a fork until the dough holds together when you press down on it.
Form the dough into a ball or disc with your hands. Place it in the center of a 9-inch fluted tart pan with a removable bottom. Press the dough onto the bottom and up the sides of the pan, then refrigerate for at least 30 minutes.
Step 4: Blind bake the crust
Line the crust with two layers of foil and fill with pie weights, dried beans or uncooked rice. Bake on a lower oven rack until the edges are lightly golden brown, 10 to 12 minutes.
Remove the foil and weights, return to the oven and bake until the bottom is golden brown, three to six minutes longer. Transfer to a wire rack to cool completely.
Editor’s Tip: There’s no need to dock the crust before blind baking it because the pie weights will keep it from puffing up too much.
Step 5: Make the custard filling
In a large bowl, beat the eggs, egg yolks, sugar and flour until smooth. Add the half-and-half cream and melted butter and stir until all ingredients are blended together. Carefully pour the custard mixture into the crust.
Step 6: Bake

Bake until the filling is set, 20 to 22 minutes. Cool on a wire rack. If desired, sprinkle with nutmeg before serving.
Editor’s Tip: The custard will continue to firm up as it cools, so it’s important not to overbake it. Remove the tart when the edges are set, but the center still has a slight wobble.
Recipe Variations
- Give it a lemon twist: To make a lemon custard tart, add 2 tablespoons of lemon zest to the crust. Then reduce the amount of melted butter in the custard by 2 tablespoons and substitute with 2 tablespoons of lemon juice. Try this same variation with other fresh citrus fruits like grapefruit or oranges.
- Top it with berries: Once it’s baked and cooled, top your custard tart with fresh berries (like these cute berry tartlets) for a beautiful presentation and added flavor.
- Use a different spice: Instead of nutmeg, try a sprinkle of cinnamon on top of the tart.
How do you store an English custard tart?
Place leftovers in an airtight container and store in the refrigerator for up to two days. Remove and let stand at room temperature for 10 minutes before serving.
Can you freeze an English custard tart?
Freezing custard tarts is not recommended. The custard is likely to split and the pastry may become soggy.
English Custard Tart Tips
Do I need to use a tart pan?
You can make English custard tarts with other types of pans. If you don’t have a tart pan, try using a springform pan or a pie dish.
Can you use store-bought custard?
English tarts are made with an egg custard. Store-bought custard does not contain eggs; it relies on cornstarch to thicken it, so you won’t get the same rich flavor and creamy texture.
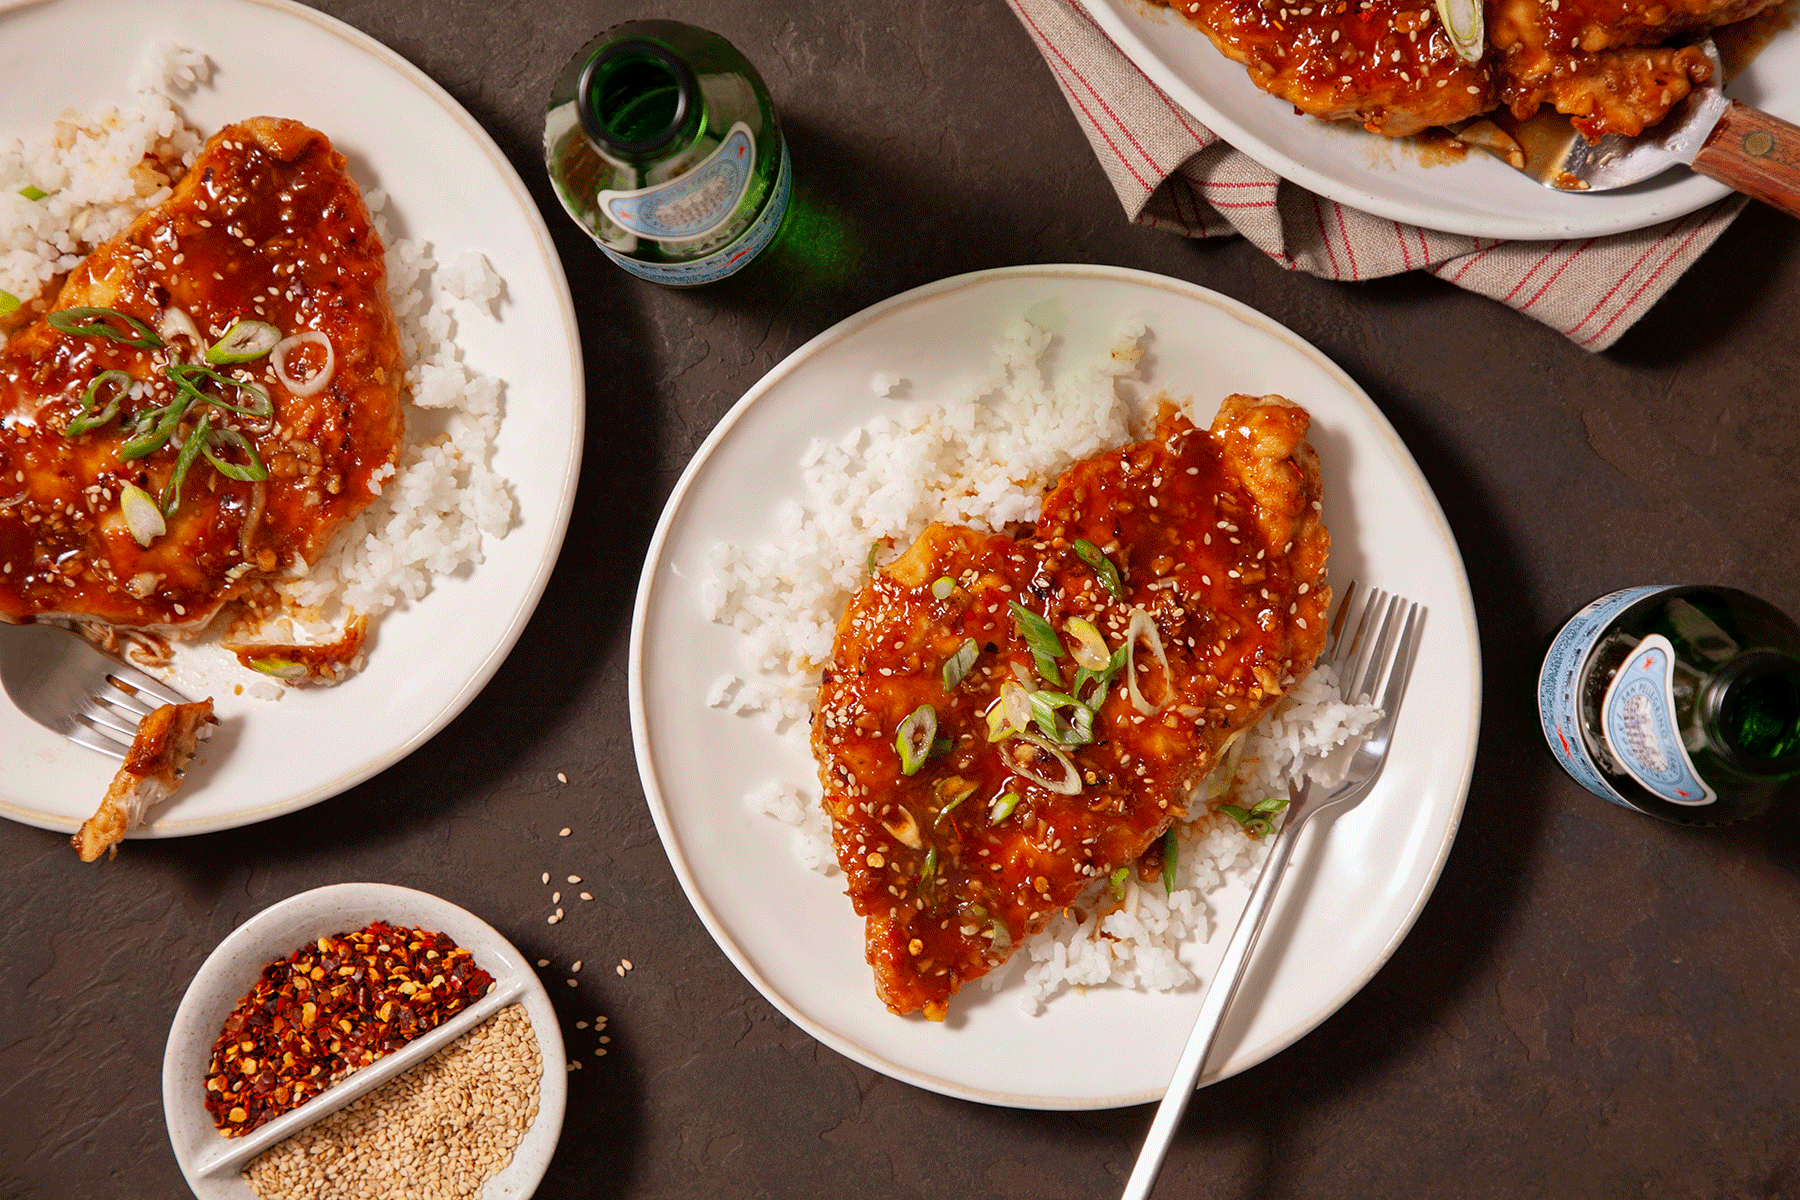
The beauty of honey garlic chicken is that with minimal preparation, the result is an entree that looks like it came out of a restaurant kitchen. The tender chicken is so lightly breaded—just enough to give it some bite—and then glazed with a deliciously sticky, sweet and garlicky sauce. Soy sauce and honey combine to form a deep umami flavor, with just a bit of acid from the rice vinegar. Perfect over a bed of rice or with quinoa and roasted vegetables, this dish will become a weekday staple.
What is honey garlic chicken?
Honey garlic chicken is exactly what you want to make when you’ve grown tired of boring, plain chicken. This recipe turns regular chicken breasts into a saucy, piquant dish using only the simplest ingredients. You get the sweetness from the honey and the minced garlic gives a nutty aftertaste.
Ingredients for Honey Garlic Chicken
- Chicken breasts: When cooked right, these tender, moist portions of the chicken provide a low-fat and flavorful protein.
- Honey: Honey is just as good in savory applications as it is in sweets. Thick and full of flavor, it also provides some of the stickiness needed for the breading to hold on to the chicken. Here are the best honey brands to keep stocked in your pantry.
- Soy sauce: A sweet and salty umami bomb in liquid form, soy sauce is a fermented garum made of soy beans. It gives dishes a salty, rich undertone.
- Garlic: Fresh garlic gives bite and sweet heat to the chicken.
How to Make Honey Garlic Chicken
This recipe makes enough lip-smacking chicken for four people.
Ingredients
- 4 boneless skinless chicken breast halves (6 ounces each)
- 1/2 cup all-purpose flour
- 1/4 teaspoon salt
- 1/4 teaspoon pepper
- 4 tablespoons butter
- 1/3 cup honey
- 3 tablespoons soy sauce
- 2 tablespoons rice vinegar
- 1 tablespoon minced garlic
Directions
Step 1: Mix your dry ingredients
Start with a large, shallow dish at least the size of a dinner plate. To the bowl, add the flour, salt and pepper and then use a fork or whisk to blend it together.
Step 2: Prepare the chicken
Lay a piece of plastic wrap or parchment on a cutting board. Place each breast on the board in an even layer, and then top with another sheet of plastic wrap. Using a mallet, gently pound the chicken, starting from the middle and working your way to the outside. Continue until the breast is 1/2-inch thick.
Step 3: Flour the chicken
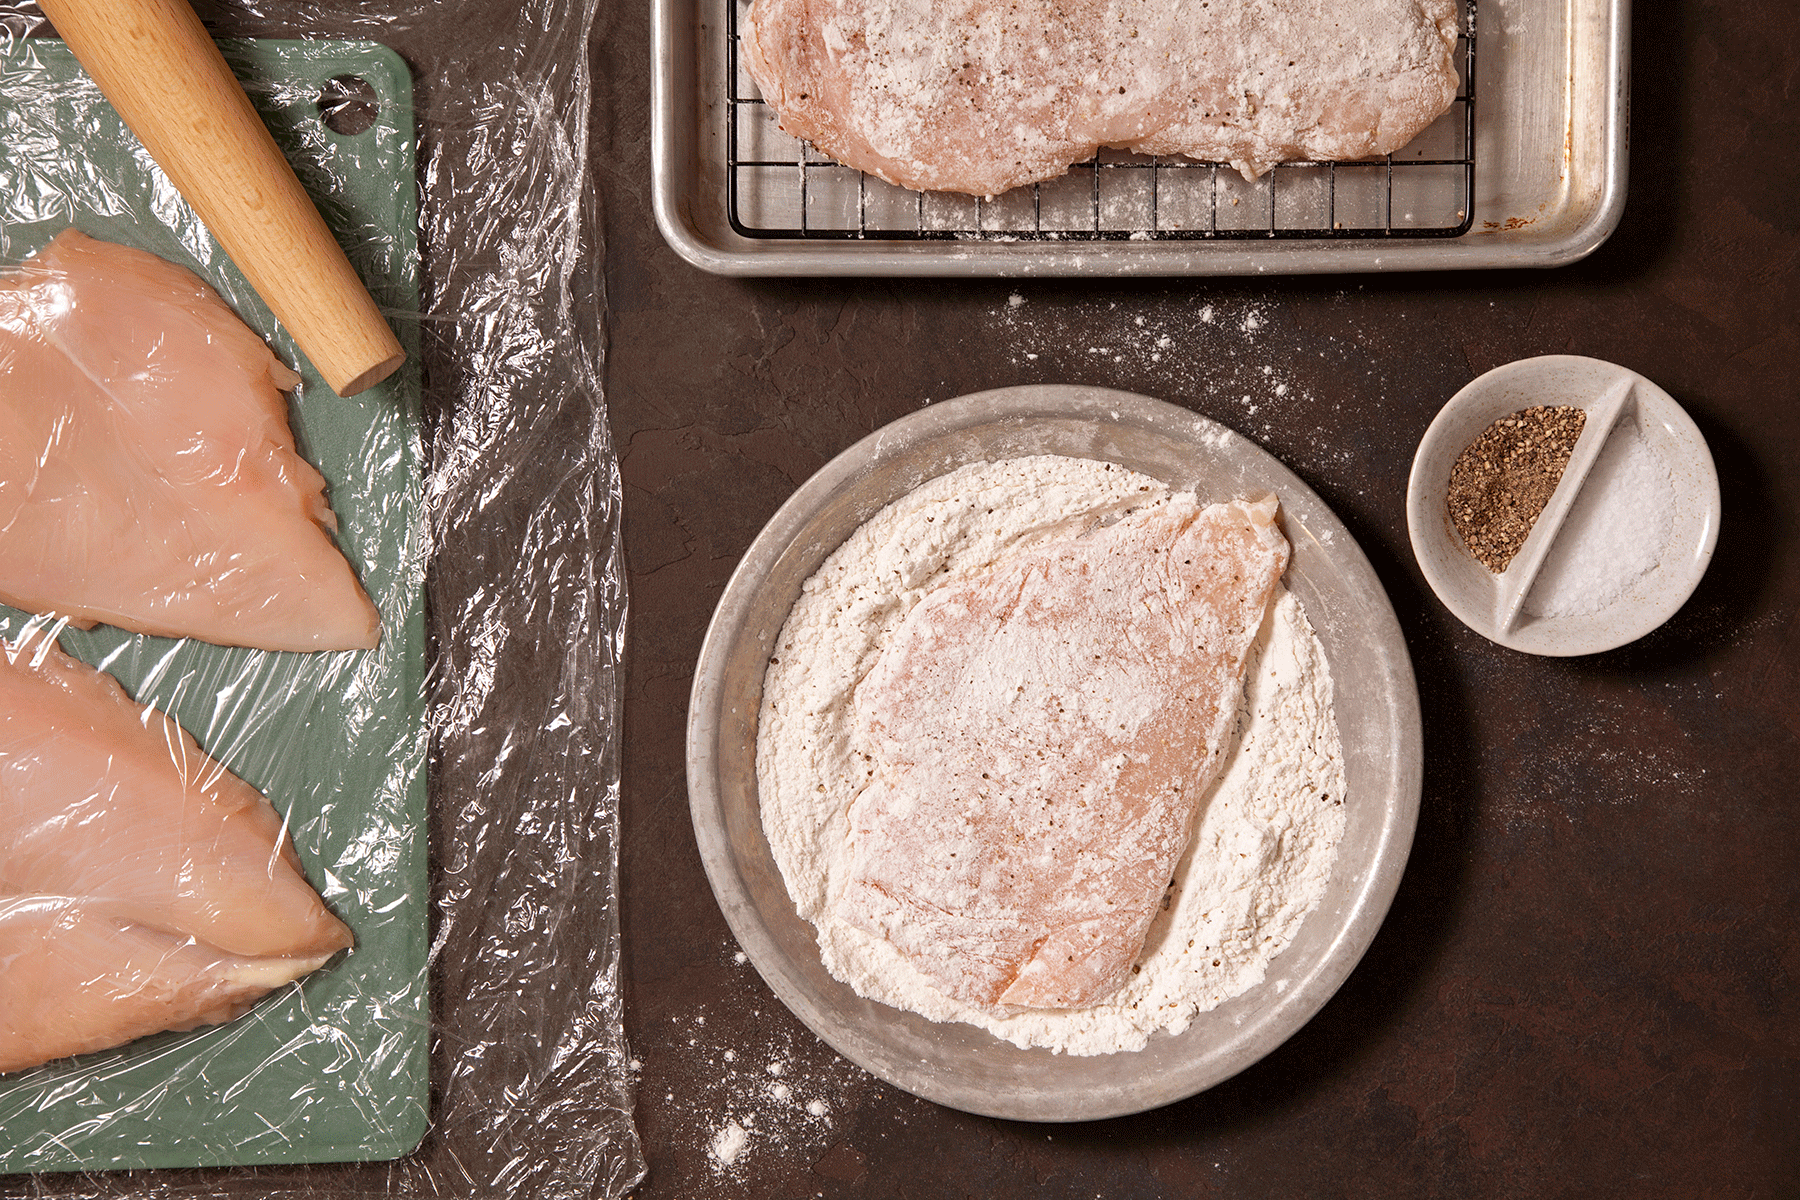
Gently lay the chicken breasts in the flour mixture. Use your fingers to gently pat the chicken to allow the flour to adhere better.
Now flip the breasts over and repeat so that flour coats both sides. Lightly shake them to remove excess flour.
Step 4: Mix liquid ingredients
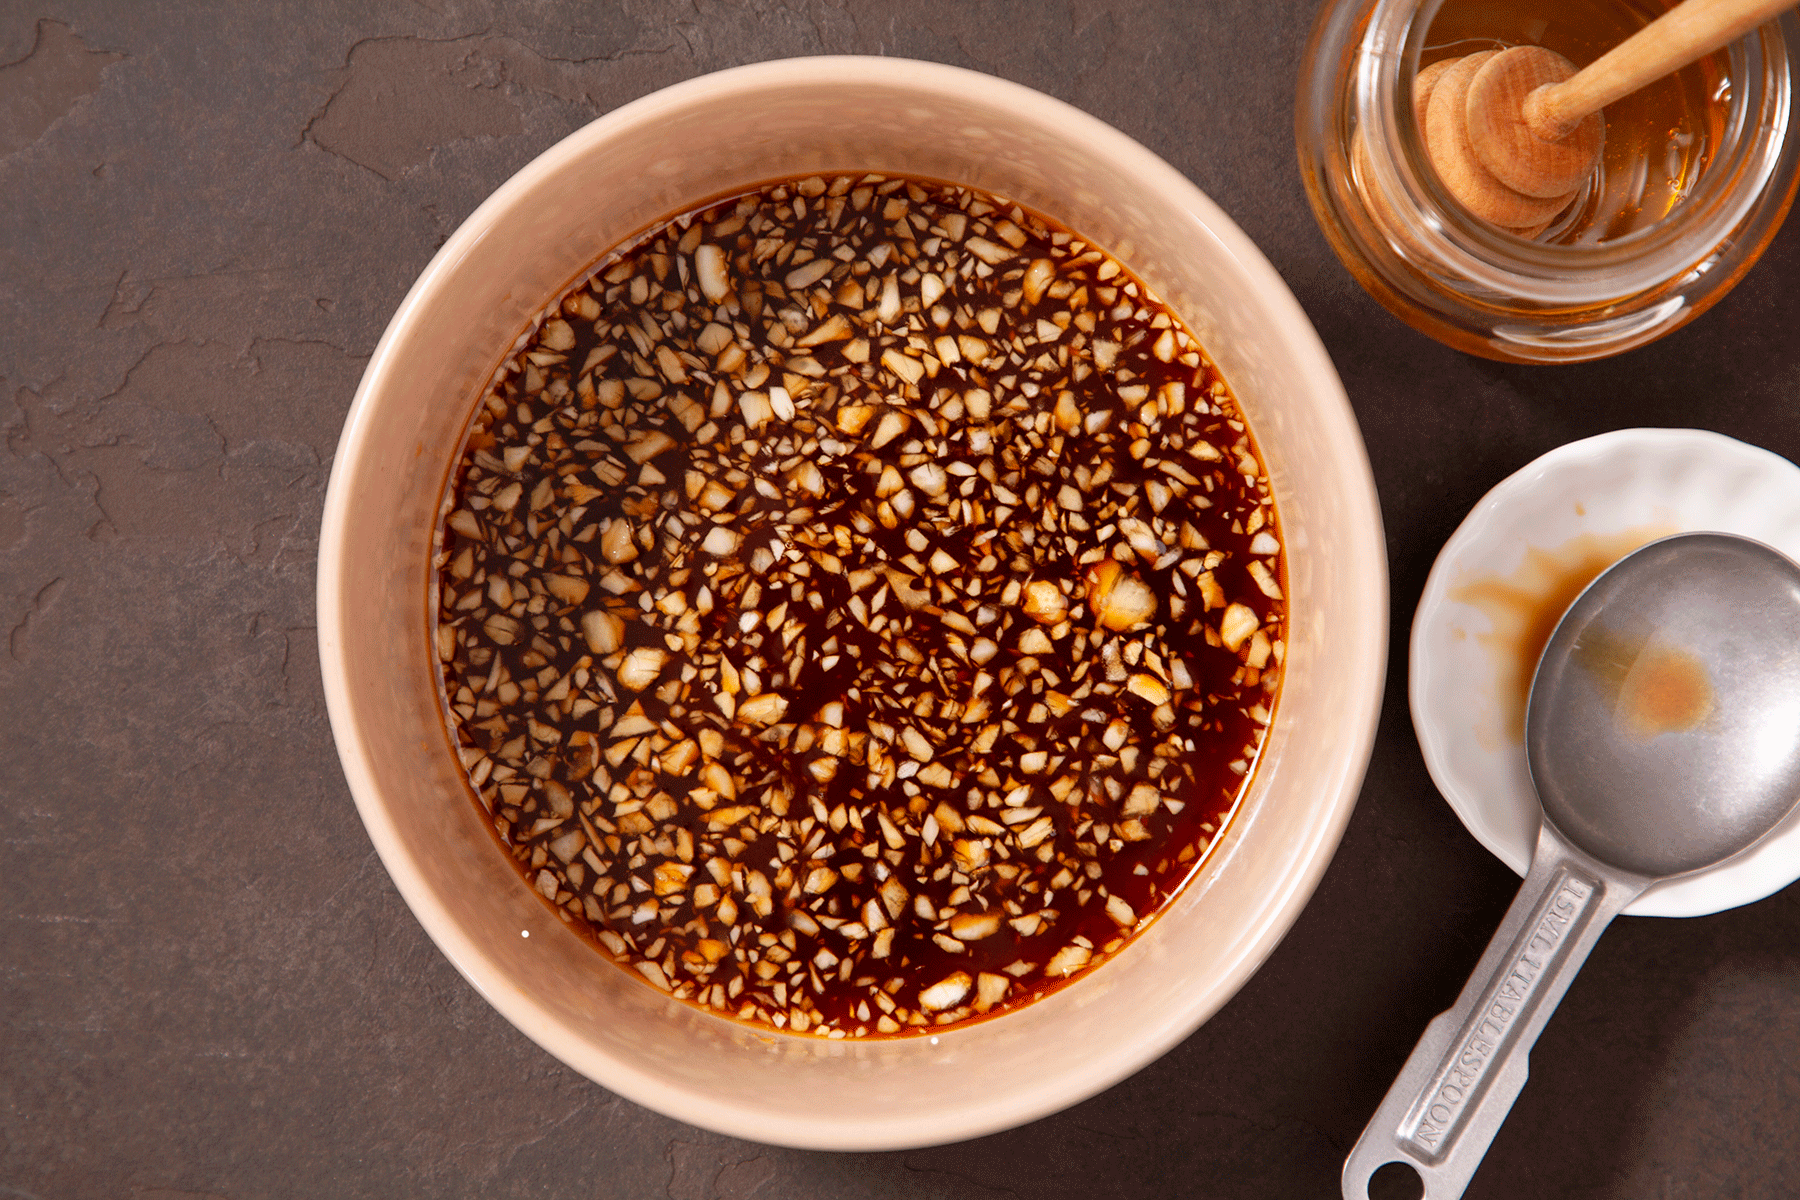
In a small bowl, combine the honey, soy sauce, rice vinegar and garlic. Mix well with a fork or whisk.
Step 5: Sear the chicken
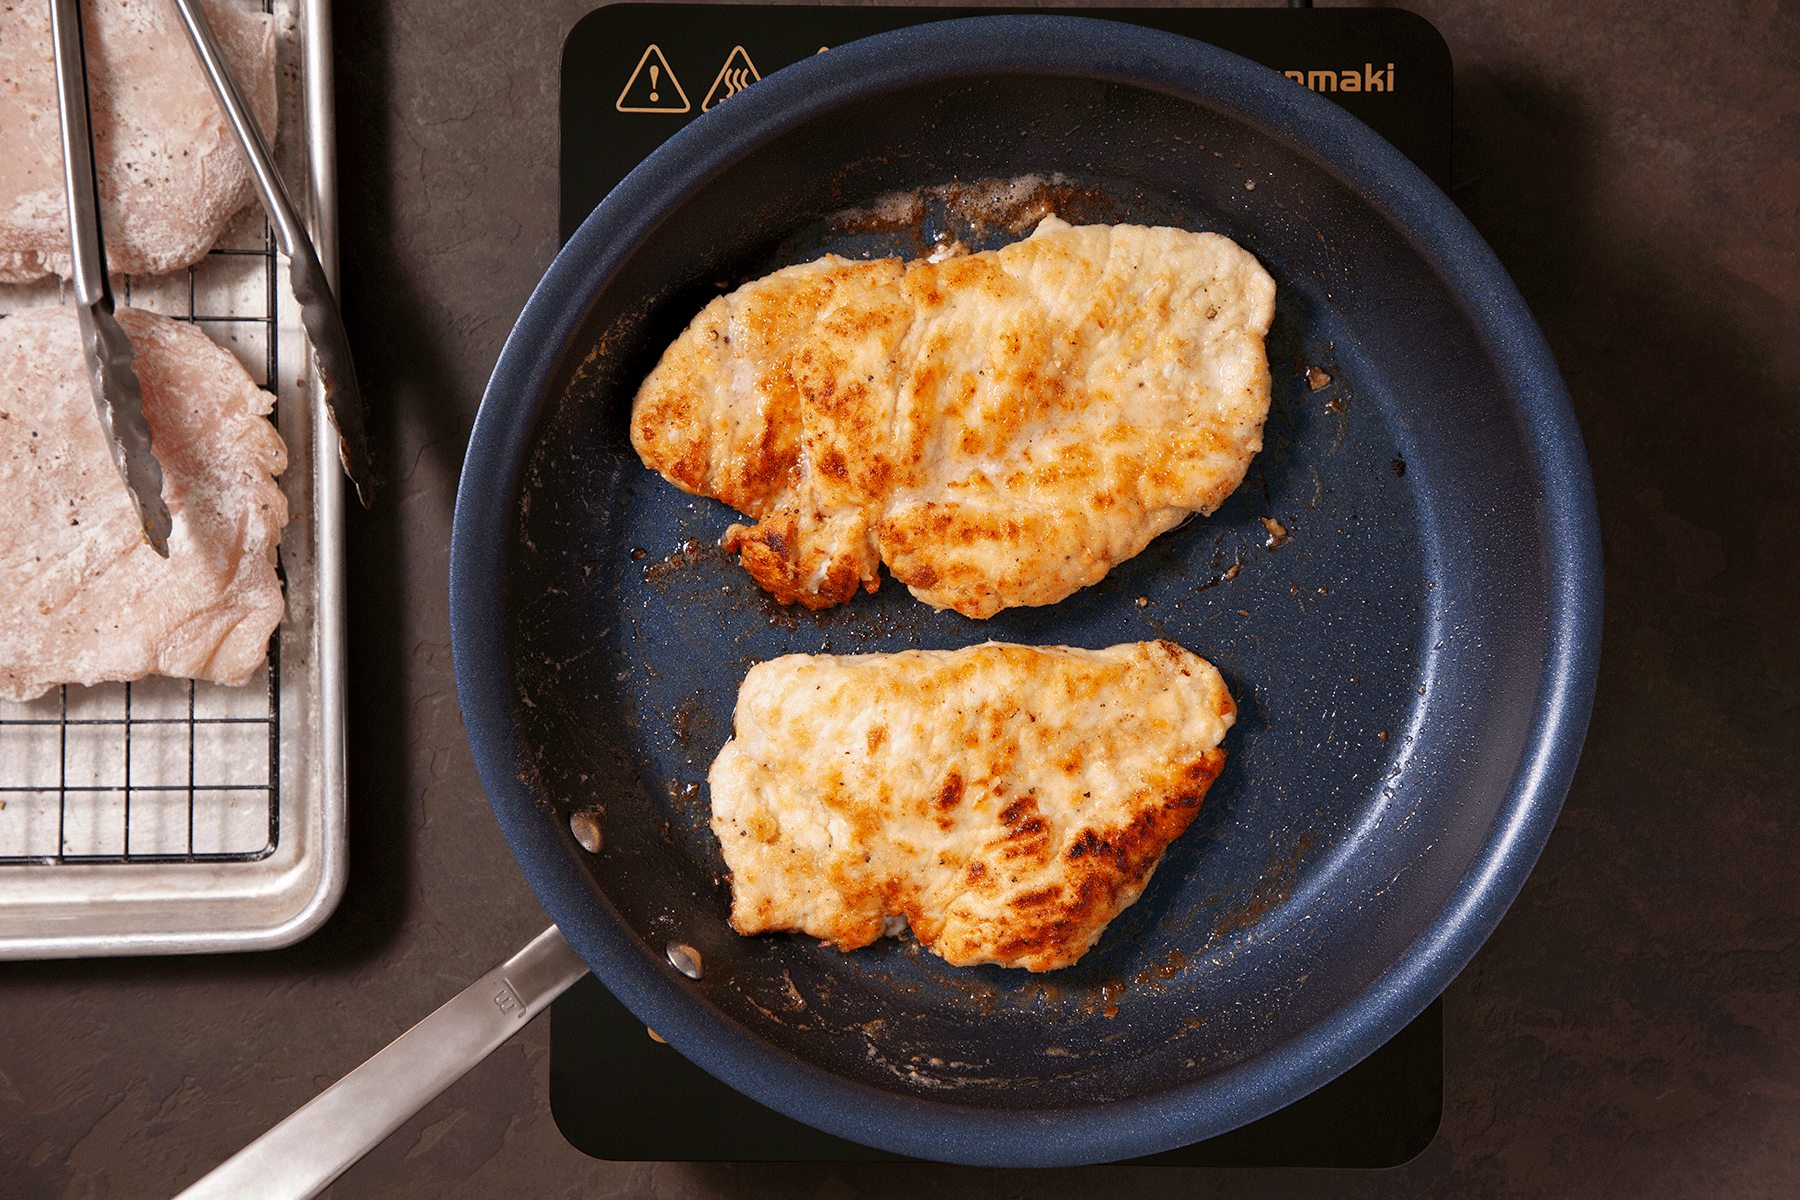
In a large skillet, melt the butter over medium heat. Once the butter starts to bubble and smells slightly nutty, add the chicken (you may need to do this in two batches depending on the size of your skillet). Cook the chicken until the skin turns brown, which you can check with a pair of tongs by just pulling up a corner of the chicken to check. Once it has browned, flip the chicken over and allow the second side to brown.
Step 6: Add the sauce and simmer
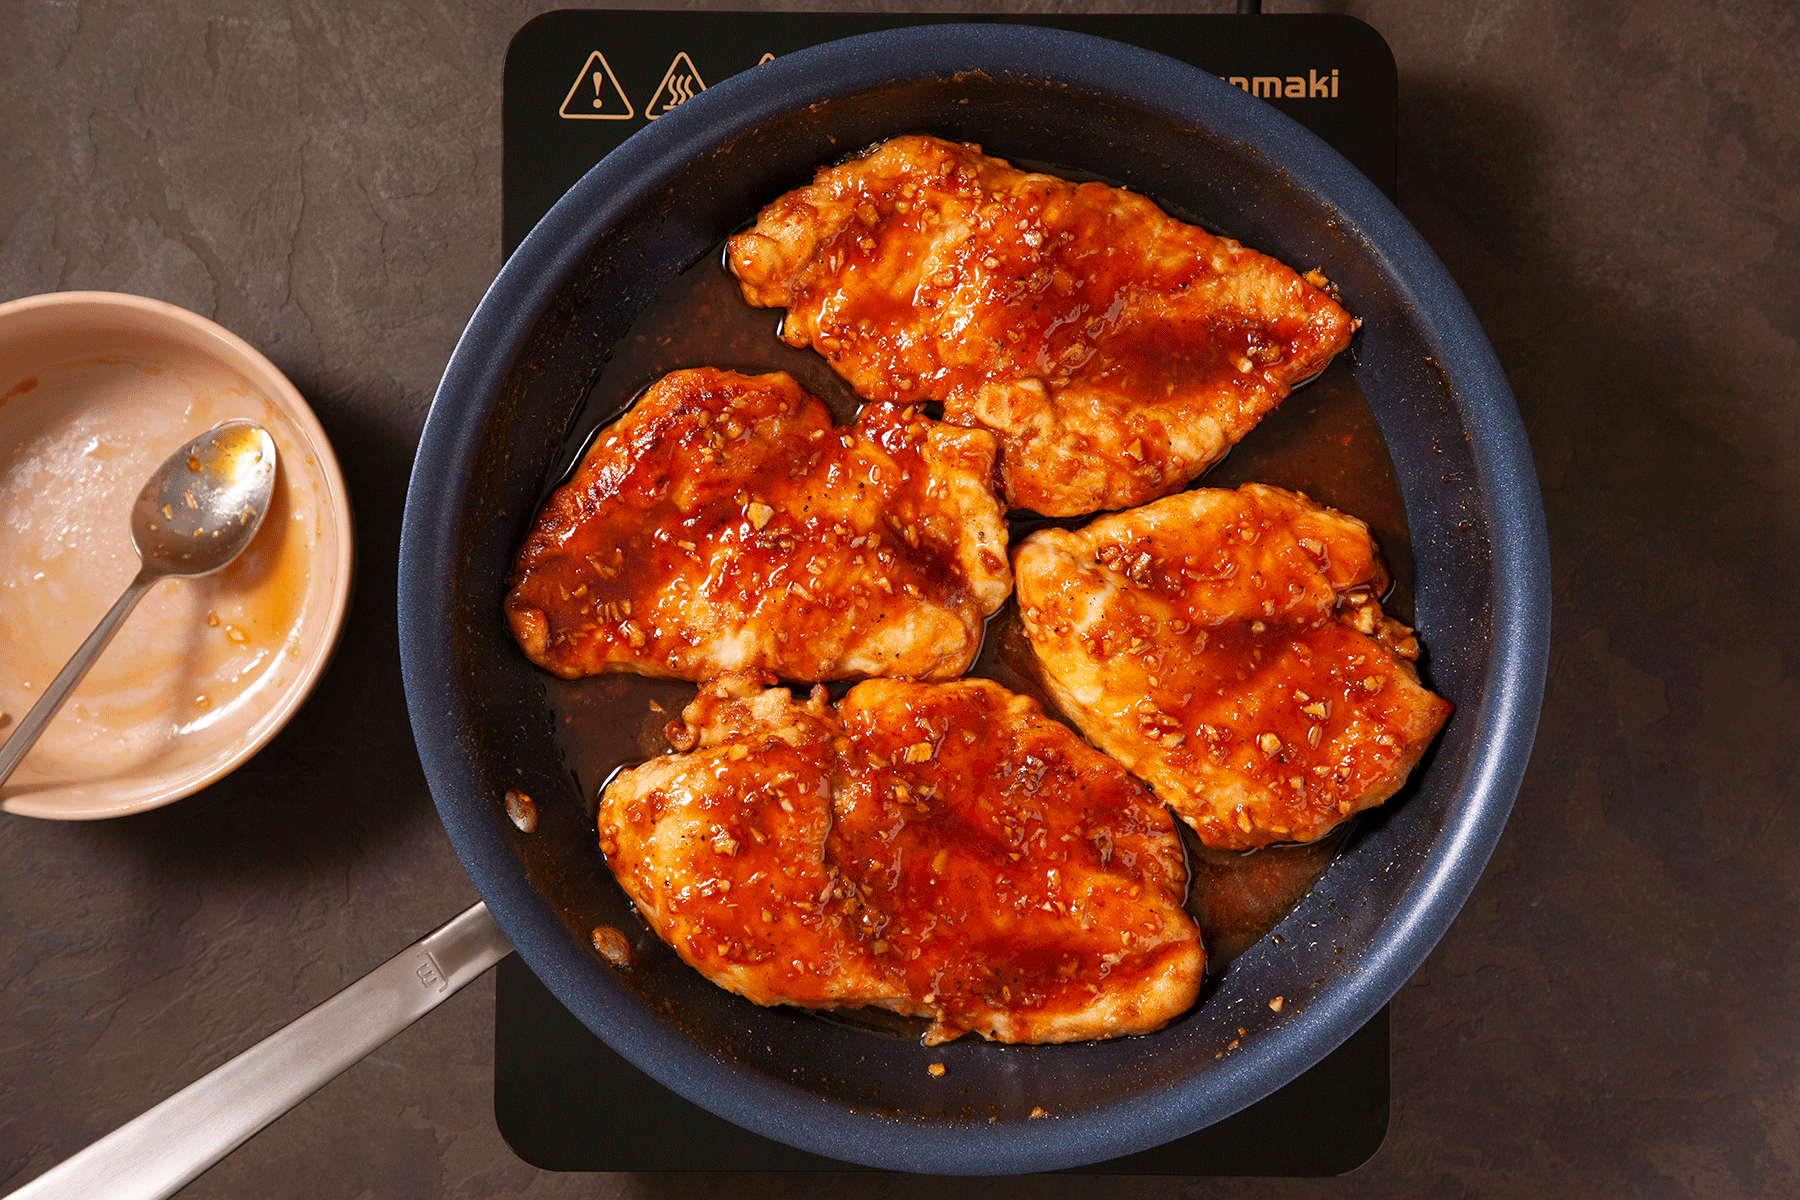
Reduce the heat to medium low, and pour the sauce over the chicken, making sure to scrape all of it out of the bowl. Flip the chicken over, so the sauced side is now on the bottom, and then leave the chicken to simmer, uncovered, until no longer pink. This should take six to 10 minutes. Keep checking the chicken so it doesn’t overcook, and don’t allow the sauce to go over a simmer. Serve immediately.
Honey Garlic Chicken Recipe Variations
- Make it a stir-fry: Honey chicken stir-fry takes the recipe above and adds vegetables to it, resulting in a delicious one-bowl meal.
- Swap the meat: If you want to mix things up, change out the chicken for pork and try honey garlic ribs.
- Use the sauce to dress a salad or slaw: Use any leftover sauce in a salad or slaw you pair with the chicken. The flavors will blend well with crisp leafy greens.
How to Store Honey Garlic Chicken
Honey garlic chicken stores beautifully in the refrigerator. To save servings for the next day or two, you can add leftovers to an air-tight container or zip-top bag. When ready to serve again, reheat in the microwave in 30-second bursts at a time, until heated all the way through.
Honey Garlic Chicken Tips
How do I prevent the chicken from being dry or overcooked?
Flattening the chicken to an even thickness will ensure even cooking without it getting tough or dry. The sauce infuses the meat with moisture. The key is to keep the skillet at medium heat, not high, and to ensure that as soon as the meat is no longer pink, you pull it off the stove.
Can I use thighs to make honey garlic chicken?
While you can use skinless, boneless thighs to make this recipe, the texture of the finished product will be slightly different (but still delicious). Dark meat is often more moist than white meat, but takes slightly longer to cook. Still, it should only take a minute or two longer, so keep an eye on the progress of the dish as it simmers.
What sides work well with honey garlic chicken?
Consider grains like rice, quinoa or couscous. Fluffy grains will soak up all the sauce and turn this dish into a warm, comforting meal. The addition of roasted vegetables will take this from a simple dish to a colorful, complete meal. Steamed or roasted broccoli or sauteed carrots or asparagus will all go magnificently with this chicken bowl. For a healthier version, consider spaghetti squash for a slightly sweet, earthy bite that will pair well with your honey garlic sauce.
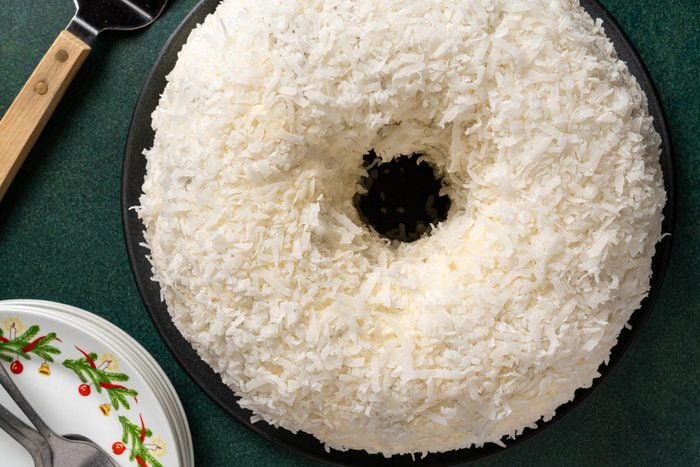
Among the Hollywood elite there is one coveted Christmas gift: the “Tom Cruise cake.” You’ve made it when you receive this white chocolate coconut Bundt cake from Tom Cruise! It’s made at Doan’s Bakery, a small family business in Woodland Hills, California. The moist and decadent coconut Bundt cake has chunks of white chocolate inside, a rich cream cheese frosting and, finally, a generous coating of coconut flakes.
Rumor has it, the cake is so delicious it will derail even the most serious Hollywood diet.
Even if you aren’t one of the lucky few to receive the Tom Cruise cake from the star himself, it’s possible to purchase one through Goldbelly. There are also a few copycat versions of this cake floating around online, so instead of splurging on the mail-order cake, I decided to recreate it myself at home. Here’s the recipe!
Tom Cruise Cake Copycat Recipe
Ingredients
Cake:
- 3 cups all-purpose flour, plus additional for dusting pan
- 1/2 teaspoon salt
- 1/2 teaspoons baking powder
- 3 cups granulated sugar
- 1 cup unsalted butter, softened
- 6 large eggs
- 1 cup sour cream
- 1 teaspoon vanilla extract
- 1 teaspoon coconut extract
- 2 cups sweetened flaked coconut
- 1 cup white chocolate chips
Frosting:
- 4 ounces cream cheese, at room temperature
- 1/4 cup unsalted butter, softened
- 1 teaspoon vanilla extract
- 1/8 teaspoon salt
- 2 cups powdered sugar
- 2 tablespoons heavy cream
- 1-1/2 cups sweetened flaked coconut
Directions
Step 1: Prep the oven and pan
Preheat the oven to 350°F. Grease and flour a 15-cup Bundt pan.
Step 2: Mix the batter
In a large bowl, combine flour, salt and baking powder. Set aside.
In the bowl of an electric mixer, cream the sugar and butter together on medium speed for about 5 minutes. Add the eggs, 1 at a time, beating well after each addition. Add sour cream, vanilla extract and coconut extract. Beat until combined.
Add flour mixture and mix until just combined; fold in flaked coconut and white chocolate chips.
Step 3: Pour into a Bundt pan
Pour batter into the prepared pan and use the back of a spoon to spread batter evenly.
Bake in the preheated oven until a toothpick inserted into the center of the cake comes out clean, about 1 hour 25 minutes. Allow cake to cool in the pan for 20 minutes before removing to a wire rack to cool completely.
Step 4: Make the frosting
To make the frosting, add cream cheese, butter, vanilla and salt to a medium bowl. Beat with an electric mixer until smooth. Gradually add powdered sugar and slowly mix until incorporated. Add cream and beat until light and fluffy, about 1 or 2 minutes.
Frost the top and sides of the cake. Lightly press the flaked coconut evenly around the outside.
Here’s What I Thought
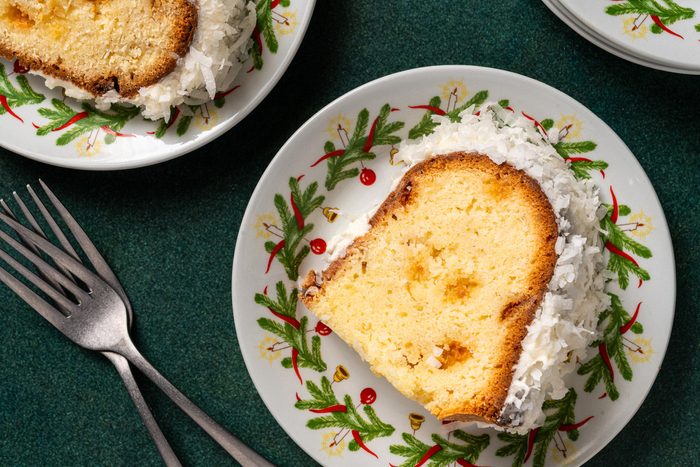
This showstopping cake was relatively easy to make and was a huge hit with my family. It’s rich and decadent, which might be too much other times of the year, but during the holidays, I think it hit the right note. Normally, I wouldn’t associate white chocolate and coconut with the holiday season, but once this cake is put together, it looks like a big snowball. For me, that made it a holiday dessert centerpiece!
I really liked that this is a forgiving Bundt cake recipe. It is always a bit nerve-wracking when you invert the cake to see if it releases perfectly or pieces stick to the Bundt pan. But since this cake is covered with frosting and then a layer of coconut, any mistakes are easily hidden.
I discovered a few tips along the way while making this cake. Once the cake has cooled, trim the bottom of the cake a bit to make sure it sits nicely on your cake stand or platter. (Plus, you get to nibble on the scraps, which is always a good thing.) I also suggest placing a piece of waxed paper underneath the cake as you add the coconut layer. That makes it easier to scoop up and reuse the bits that fall and helps you coat the entire surface.
In the end, I decided that I’m no longer worried about being on Santa’s naughty or nice list. I just want to be on Tom Cruise’s Bundt cake list!
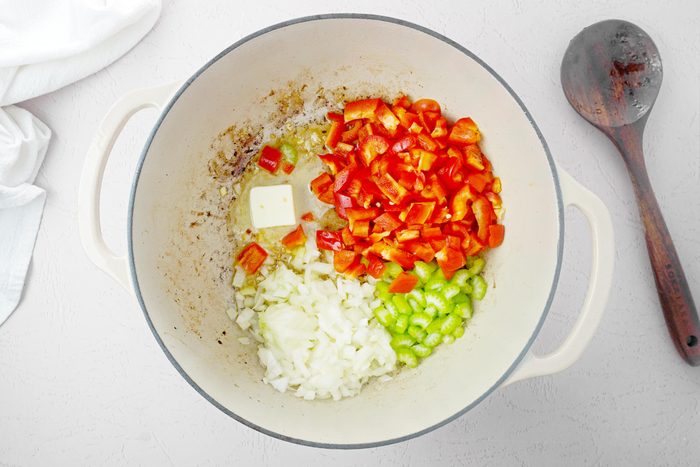
For a spicy twist on a classic soup recipe, whip up a pot of this easy Cajun potato soup. Just like old-fashioned baked potato soup, this recipe is loaded with chunks of russet potatoes, plenty of cheese and a splash of cream, but kicked up a notch thanks to spicy andouille sausage, colorful bell peppers and a healthy dash of Cajun seasoning.
Perfect for those who love a little spice, this quick and easy soup recipe will warm your soul all season long.
Ingredients for Cajun Potato Soup
- Andouille sausage: This spicy sausage is a staple in any Cajun-inspired recipe.
- Bell pepper: Add color and sweetness to this creamy potato soup.
- Cajun seasoning: This handy spice blend adds instant heat and Cajun flavor. You can use a store-bought blend or make your own Cajun seasoning.
- Heavy whipping cream: A splash of heavy cream is the secret trick to making any soup rich and indulgent.
- Russet potatoes: We love russet potatoes for this soup. Their high starch and low moisture content allow them to help thicken the soup without losing their shape.
How to Make Cajun Potato Soup

Ingredients
- 1 ring (13.5 ounces) andouille sausage, sliced into 1/4-inch rounds
- 2 tablespoons olive oil
- 3 cloves garlic, minced
- 1/2 teaspoon crushed red pepper flakes
- 1 cup yellow onion, diced (about 1 small onion)
- 1/2 cup celery, diced (about 1 rib of celery)
- 1 cup red bell pepper (about 1 medium pepper)
- 2 tablespoons unsalted butter
- 4 cups chicken broth
- 3 teaspoons Cajun seasoning
- 1/2 teaspoon kosher salt
- 1/2 teaspoon smoked paprika
- 4 large russet potatoes, peeled and cut into 1-inch cubes
- 1 cup heavy whipping cream
- 1/4 cup Parmesan cheese, freshly grated
- 3/4 cup cheddar cheese, freshly grated
- 1/4 cup fresh parsley, chopped
Directions
Step 1: Brown the sausage

Warm a Dutch oven or heavy-bottomed stock pot over medium-high heat. Add the sliced sausage to the pot and cook for 2–3 minutes until the slices brown on the edges. Remove to a plate.
Step 2: Saute the vegetables
Reduce the heat to medium, then add the olive oil, garlic and crushed red pepper flakes. Cook for 1 minute until fragrant, then add the butter, onions, celery and bell pepper. Cook until the vegetables soften, about 5-7 minutes.
Step 3: Add broth, spices and potatoes
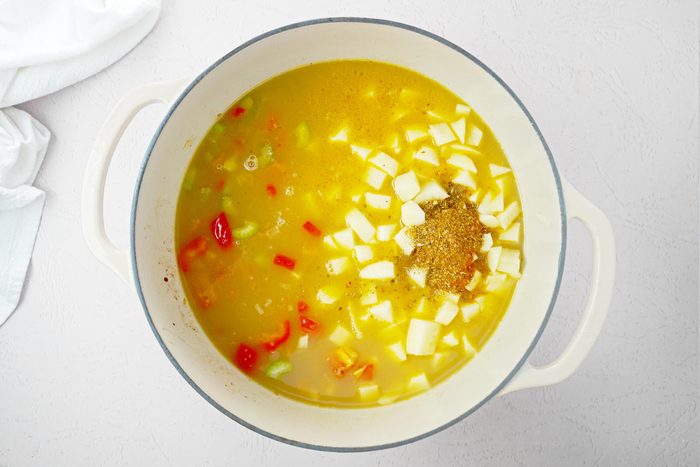
Pour in the chicken broth (store-bought or homemade broth) and add Cajun seasoning, salt, paprika and the cubed potatoes. Bring the soup to a boil, then reduce to a simmer and cook for 15-18 minutes until the potatoes are fork tender.
Step 4: Make it rich and creamy
Reduce the heat to low, pour in the heavy cream, and add the Parmesan and cheddar cheese. Stir until the cheese has melted and the soup is smooth and creamy.
Step 5: Finish with sausage and parsley

Return the sausage to the pot and stir in the parsley. Cook the creamy soup for 5 minutes and then ladle into bowls. Serve hot, garnished with additional parsley. Enjoy!
Cajun Potato Soup Variations
- Extra meat: For an extra meaty variation, add 1/2 pound of cooked chicken breast and/or 1/2 pound of raw large, peeled and deveined shrimp during the final 5 minutes of cooking. Cook until the shrimp are pink and fully cooked.
- Dairy-free: For a dairy-free Cajun potato soup, omit the cheese and opt for a 14-ounce can of coconut milk or another dairy-free cream substitute. For cheesy flavor, add 1–2 tablespoons of nutritional yeast, if desired.
- Vegetarian Cajun potato soup: Opt for vegetable broth instead of chicken broth. Swap the andouille sausage for your favorite brand of spicy plant-based sausages.
How to Store Cajun Potato Soup
Leftovers of this soup may be refrigerated in an airtight container for 3-4 days. To reheat, warm gently on the stovetop, stirring occasionally until heated through.
Editor’s Tip: Warm gently upon reheating. Dairy-containing soups tend to separate when heated too quickly over high heat. For best results, warm the soup low and slow.
How to Freeze Cajun Potato Soup
As a general rule, soups containing dairy do not freeze well, as they tend to separate and curdle upon thawing and reheating. If you plan to store leftovers of this soup in the freezer as a make-ahead meal, we suggest cooling the soup and freezing it after step 3 of the directions. Then, finish the soup, adding the remaining ingredients upon reheating.
Cajun Potato Soup Tips

How can I thicken Cajun potato soup?
If you want to thicken soup, add a cornstarch slurry (2 tablespoons of cornstarch mixed with 1/4 cup of water) during step 4 after adding the cream and cheese.
Can I use shredded cheese in potato soup?
While shredded cheese is convenient, it isn’t the best choice for this soup. Most packaged shredded cheese contains additives to prevent caking and clumping in the packaging. These can inhibit a cheese from melting smoothly in creamy soups. Therefore, for best results, we recommend shredding the cheese fresh from the block for this recipe.
What are the best potatoes for soup?
When choosing potatoes for soup, opt for a potato variety that is high in starch and low in moisture. Russets and Idaho potatoes are both great options. Their high starch content will help thicken the soup and make it creamy. Meanwhile, their low-moisture content will allow them to hold their shape through the cooking process without getting mushy.
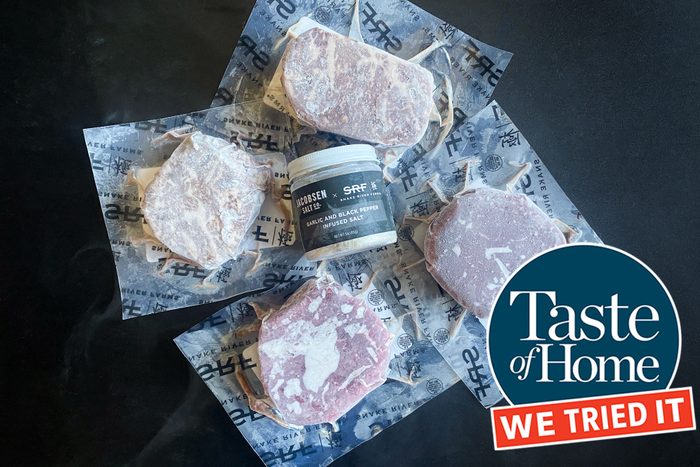
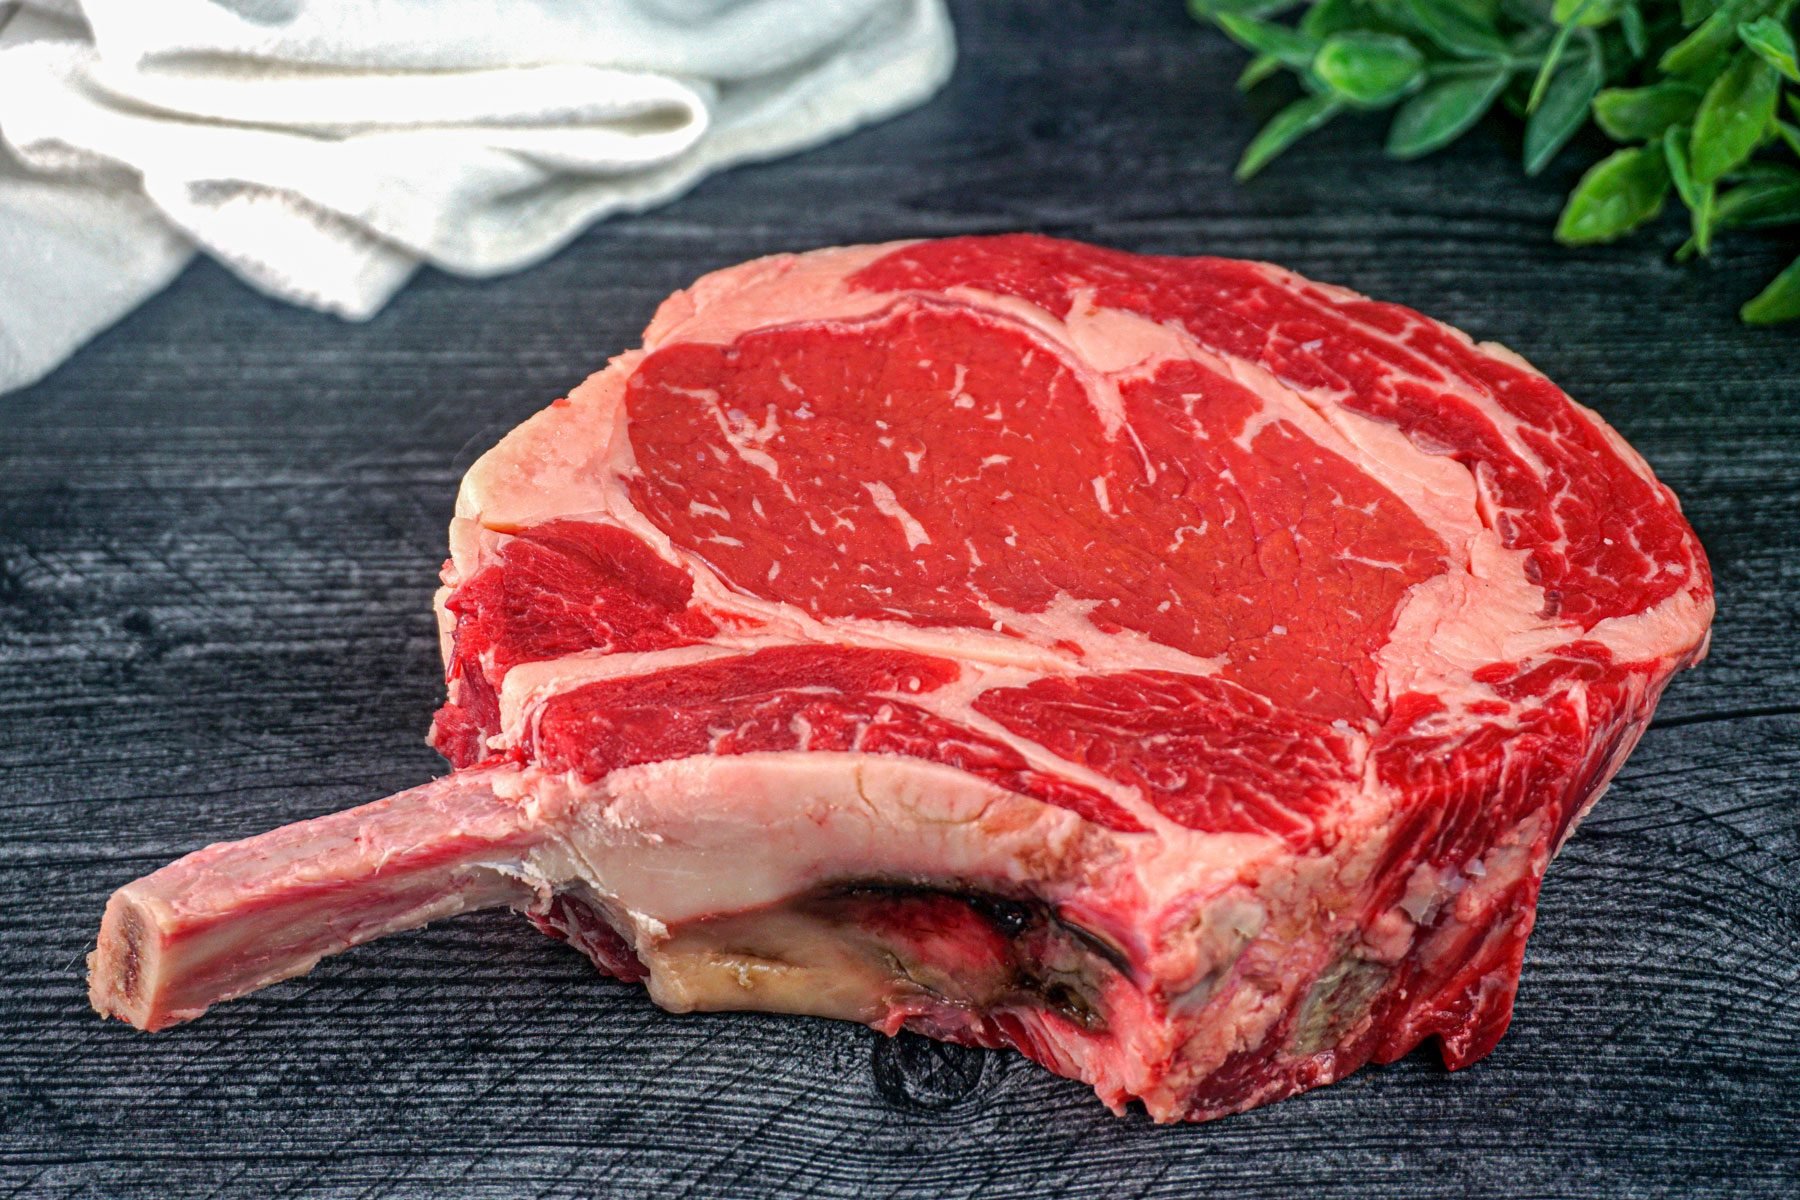
Carnivores, listen up. You likely have heard of Wagyu beef, which is known as the most tender and tasty beef on earth. Traditionally only found in Japan, Snake River Farms brings this delicacy stateside. The online meat delivery brand is one of the few sources of American Wagyu, as well as the equally-revered Kurobuta pork. As a food and recipe writer, as well as a former chef, I needed to know if these cuts were worth the hype and hefty price tag.
What is Snake River Farms?

Snake River Farms is a mail-order meat company that’s most famous for being one of the few companies to raise and sell American Wagyu beef. This breed of cattle is one of the world’s rarest, but also one of the most delicious. (And one of the most expensive!)
To produce true Wagyu beef, Snake River Farms upholds incredibly high standards. Raised humanely with environmentally sound practices, Snake River butchers and ships their meat straight from the farm. It’s pricey when compared to supermarkets, but when compared to steakhouses, it’s a downright bargain. (Not to mention higher quality.) Treat yourself to a Wagyu ribeye filet and you’ll see what we mean.
In addition to the Wagyu that made them famous, Snake River Farms offers another type of premium meat: Kurabuto pork. This breed of Berkshire pig also originates in Japan, where they are fed a controlled diet that’s specifically designed to create juicier, more flavorful meat with unparalleled fat marbling.
Aside from these two ultra-premium meats, Snake River Farms offers less expensive USDA Choice and Prime beef, as well as pricey dry-aged beef and pre-smoked barbecue. They also have several premium seafood items, giving customers a surf and turf option.
Meat and seafood from Snake River Farms come frozen and packaged in vacuum-sealed portions. Cuts arrive packed in a reusable thermal bag with dry ice and eco-friendly insulation in a 100% recyclable box.
Editor’s Tip: There are so many good reasons to buy chicken online, but which poultry is worth the premium price? We tested 10 services to find the best-of-the-best chicken delivery.
 VIA MERCHANT
We Tried It
Snake River Farms
The pioneer of American Wagyu beef, Snake River Farms produces world-class beef by staying involved at every step of the way, from ranch to table.
Snake River Farms Features
Meat from Snake River Farms can be purchased a la carte, and there is a $49 minimum. Expect to find:
- American Wagyu: Steaks, roasts, briskets, hot dogs, burgers, specialty butcher’s cuts, sausage, tallow
- Kurobuta Pork: Pork chops, ham, bacon, ribs, roast, salami, shanks, pork belly, sausages
- Wild-Caught Seafood: Alaskan king crab legs, Maine lobster tails, King salmon, Pacific Northwest halibut, sea scallops, shrimp
- Pre-Smoked BBQ: Brisket, pork spare ribs, beef short ribs, pork steaks, burnt pork ends, sausage
The company also offers a wide array of gift sets and sampler boxes. Standard 1-3 day shipping costs $9.99, 2-day shipping is $24.99 and overnight shipping is $49.99.
How We Tested It
To see if Snake River Farms’ premium meats are worth the premium price, I tested the following cuts in my kitchen. Here’s what I thought.
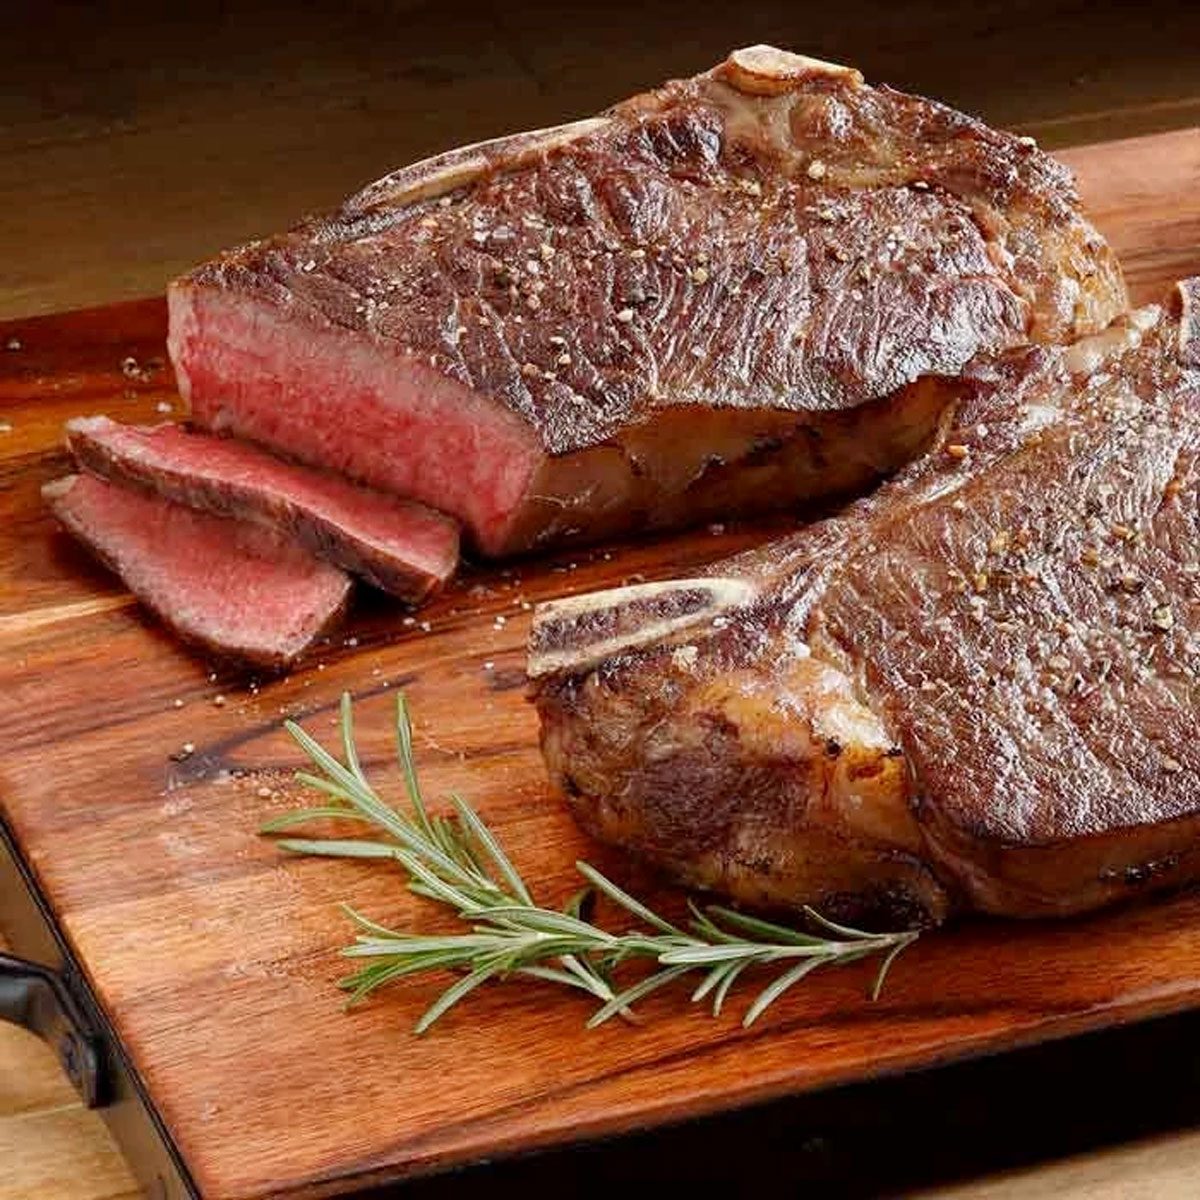
Wagyu Steaks
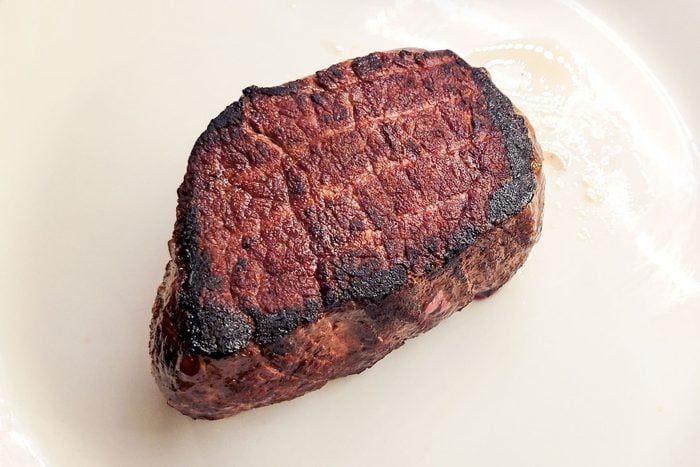
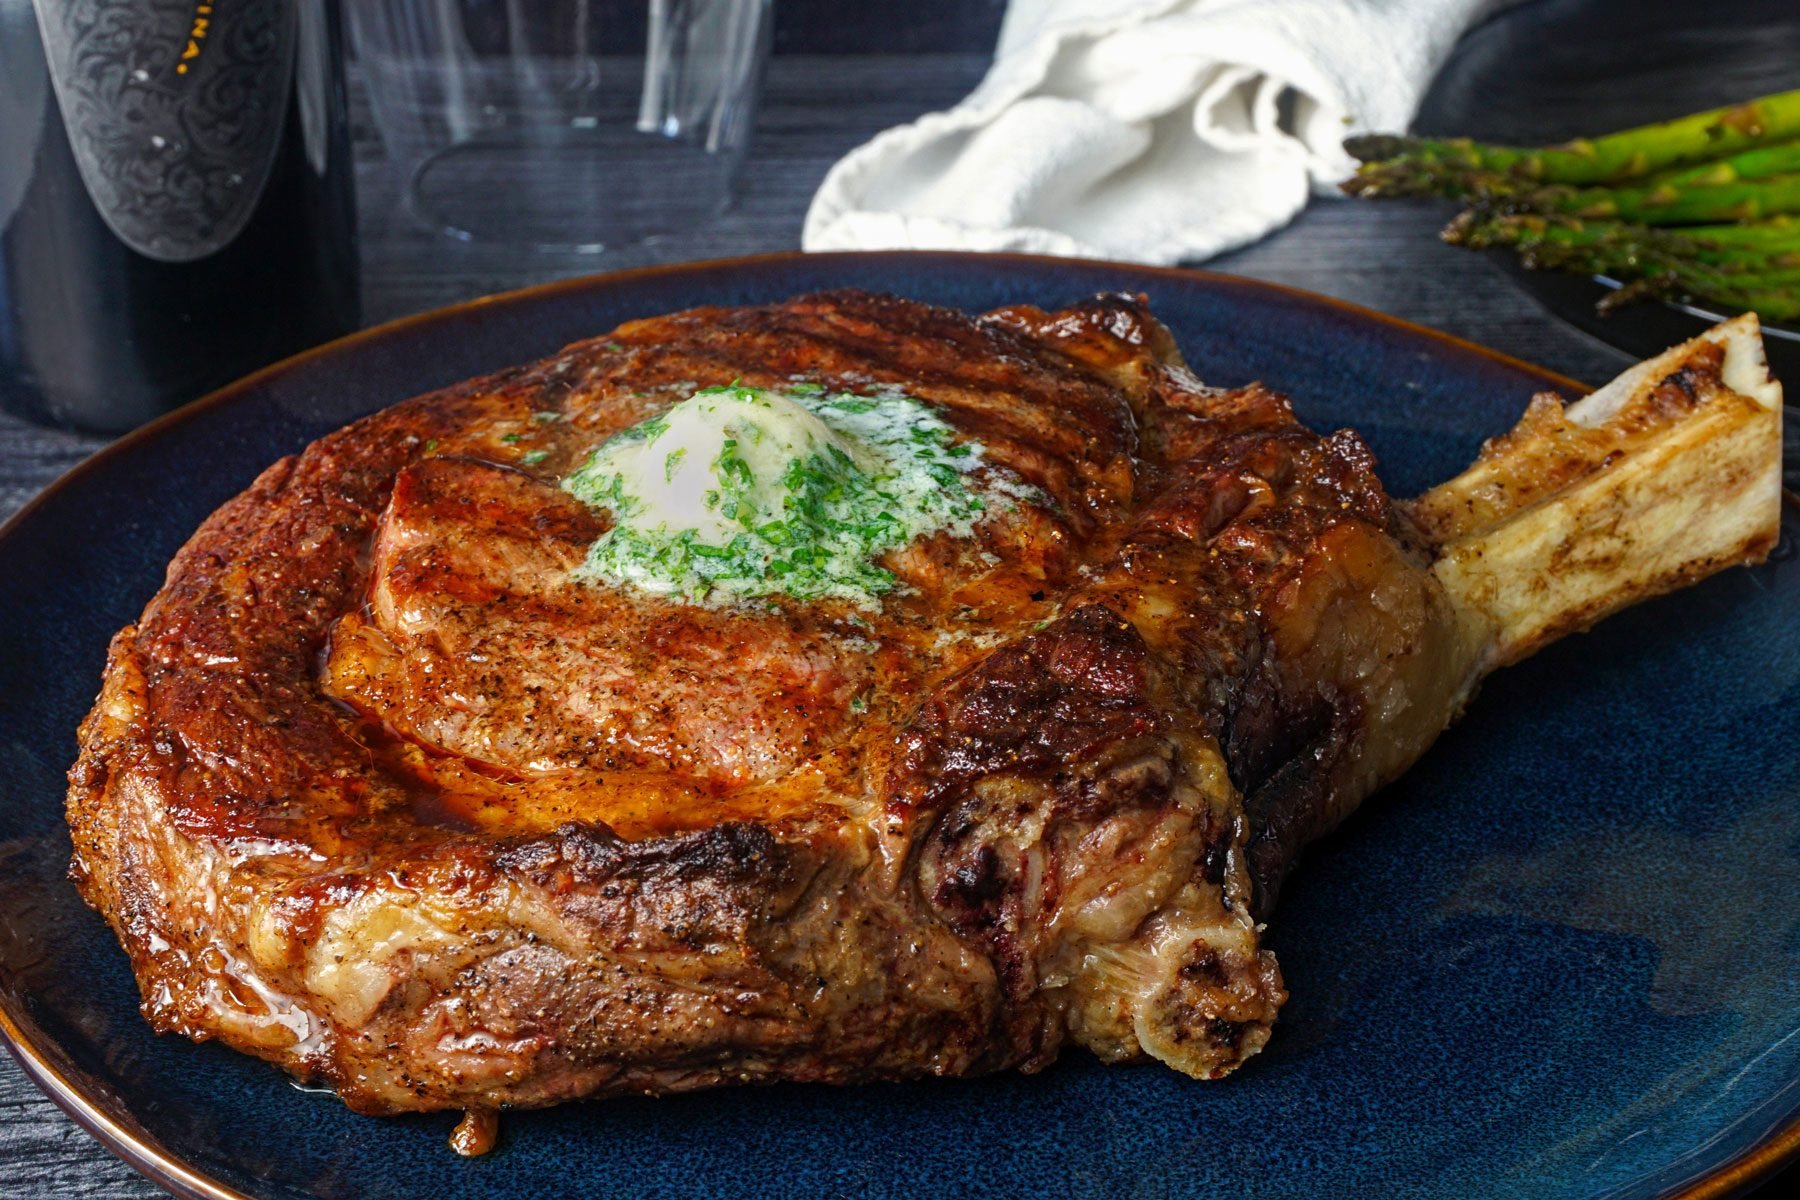
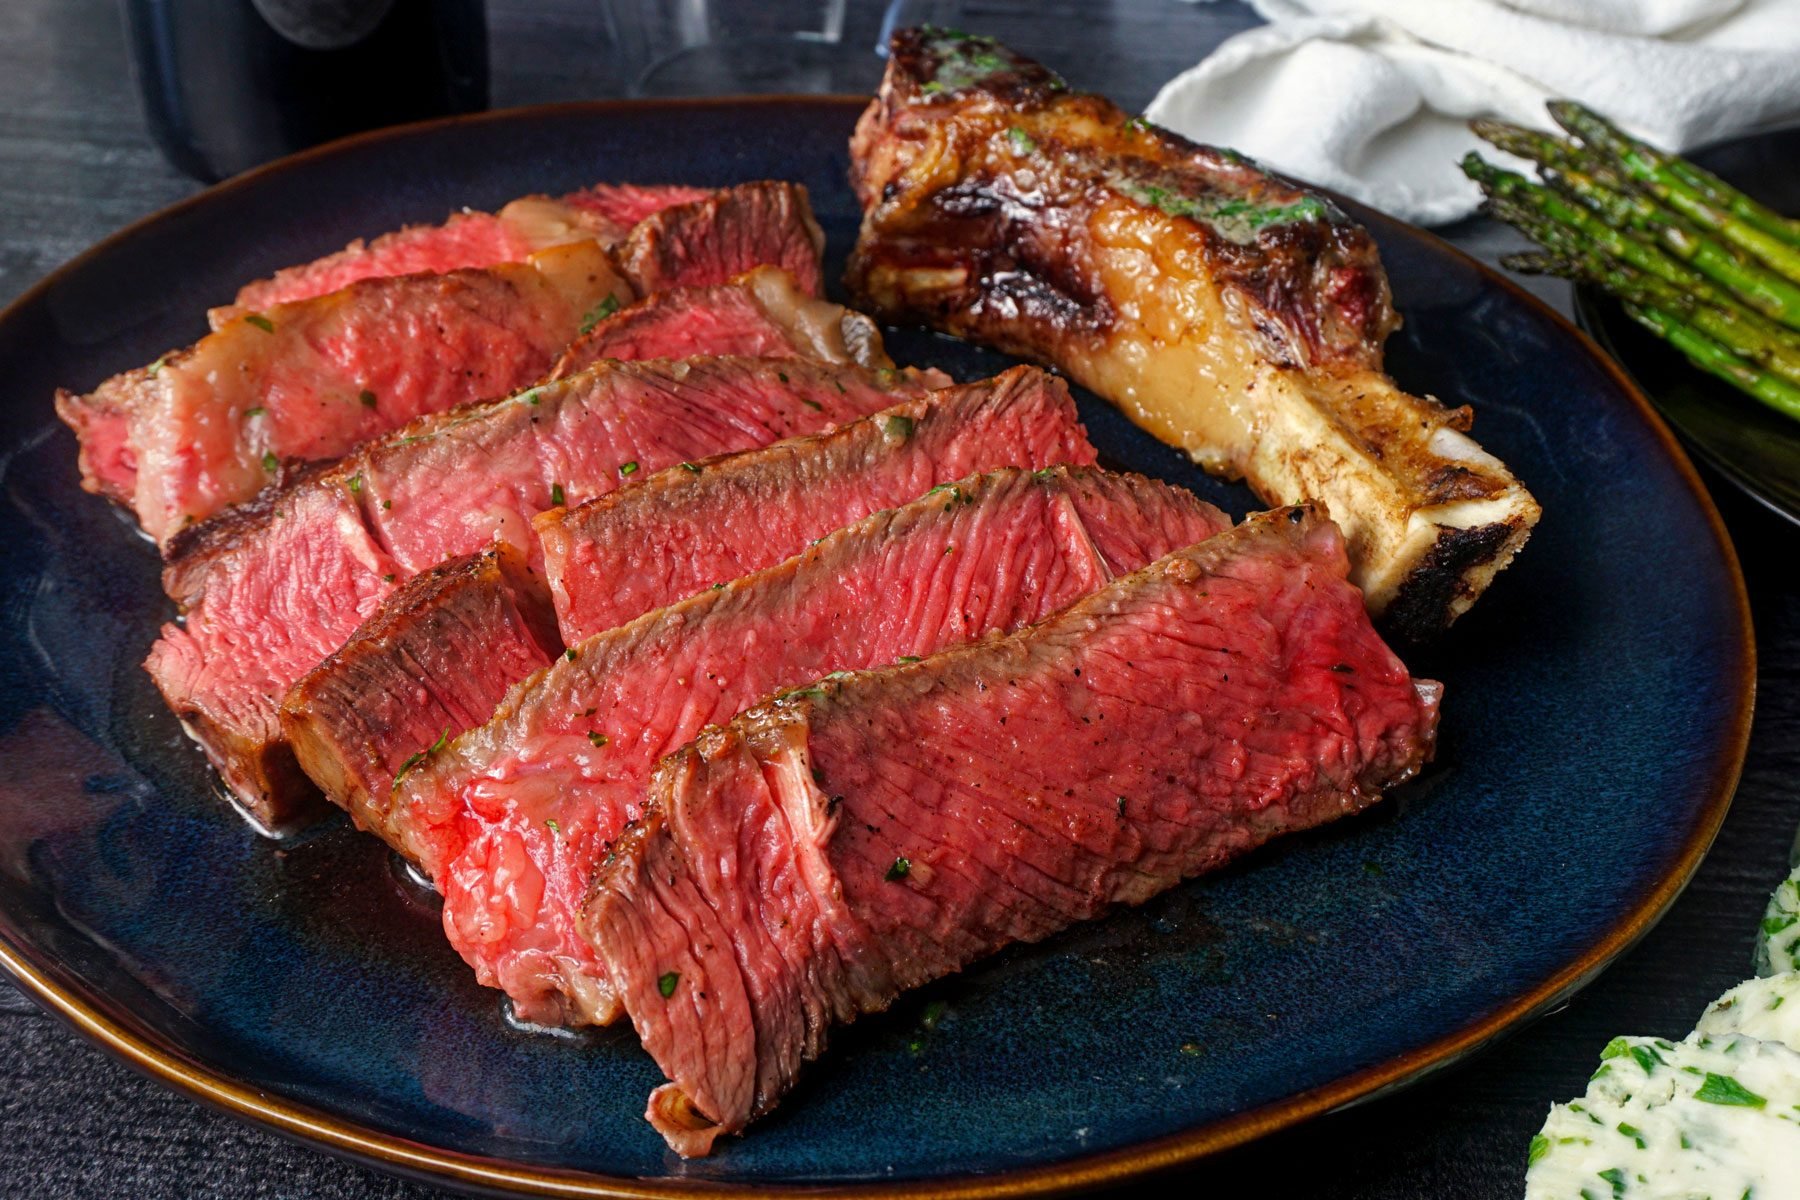
To test Snake River Farms’ Wagyu filet mignon and ribeye steak, I used the reverse sear method: cooking them in a 200-degree oven until their internal temperature was 120 degrees, then seared each side for 90 seconds in a cast iron skillet slicked with shimmering-hot oil. These steaks were seasoned and served with nothing but salt, which is not only all they need to be cooked with but all they should be served with. The flavor of these steaks was unreal, and to cover it up with a single spice or a drop of sauce is practically sac-religious.
One bite of these steaks is enough to bring a tear to your eye and answer any questions you may have had about Wagyu being worth its insanely high price tag. The meat is fork-tender; you don’t need to chew it as much as you let it melt on your tongue. The flavor is so spectacular, that there are no words in the English language to do it justice. It’s not something most people could afford to eat regularly, nor should they. This steak deserves to be a special occasion occurrence, where it is venerated and appreciated. Wagyu beef is the very definition of a splurge, and you must promise yourself that you’ll eat at least one of these steaks in your lifetime.
Kurobuta Pork Chop
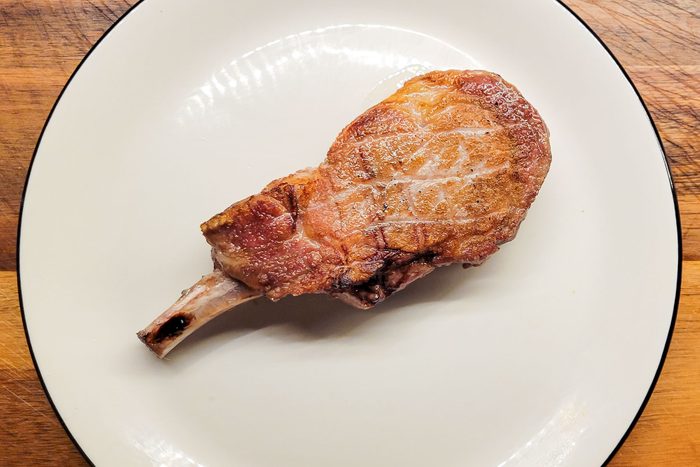
I’d never tasted Kurobuta pork before eating this pork chop, and I’m afraid it may have ruined all other pork chops for me. Conventional pork features a mild flavor (there’s a reason it’s called “the other white meat”). And in comparison to this pork chop, it may very well taste like nothing at all. Kurobuta has perfect pork flavor—just like the steaks, Snake River Farms’ Kurobuta pork needs to be tasted to be believed. The meat is so tender, you can delicately nibble it directly from the bone.
Wagyu Hot Dogs and Hamburgers

Even though Wagyu is worth the price, you might not be ready to do some heavy-duty splurging on a few steaks. That’s why I was so keen to test Snake River Farms’ burgers and hot dogs. At $7 per burger patty and $12 for five jumbo hot dogs, these all-American favorites seem like the best entry point to the world of Wagyu. And they were!
The hot dogs were plump and juicy and tasted more expensive than the price tag lets on. I usually take my hot dogs with mustard and sauerkraut, but declined both after first tasting these plain. If you know someone who loves hot dogs, order these for their next special occasion dinner. They will be astounded, and you will forever be a hero.
Like the steaks, the burgers I reverse-seared to a brilliantly red medium-rare. Served with cheddar and onions on a toasted brioche bun, they were heavenly. Eaten plain with a fork and a sprinkling of flaky sea salt, they were better than any steak you can find in the supermarket.
Pre-Smoked Pork Spare Ribs and Spicy Beef Sausages

Snake River Farms’ meat is raised in the Pacific Northwest. But when it comes time to smoke it into world-class barbecue, it’s sent south to the Lone Star State. Founded in 1882 in Elgin, Texas, Southside Market and Barbeque smokes a variety of beef and pork cuts for you to finish cooking on the grill or in the oven, including brisket, ribs and sausages. Unsurprisingly, the pork spare ribs were the best mail-order barbecue I’ve ever tasted, delivering a true taste of Texas to my tiny Baltimore kitchen on a cold December day.
The spicy beef sausages were tasty but true to their name. I have a high tolerance for heat, so when I say these sausages are spicy spicy, I mean it. If you like your sausages on the milder side, order Southside’s original smoked sausage recipe instead.
Pros
- Phenomenal flavor
- Highest possible quality
- Meat comes packaged in individual portions
- Delivered frozen solid
- Eco-friendly packaging
- Company has strict sustainability standards
- Good selection
Cons
- Pricey (though worth it)
FAQ
Where is Snake River Farms located?
Snake River Farms’ headquarters is in Boise, Idaho. The company’s ranches and processing facilities are spread out across Idaho, Oregon and Washington state.
Is Snake River Farms meat shipped frozen?
Yes, Snake River Farms meat ships frozen. It comes in eco-friendly packaging, with a recyclable box and compostable/biodegradable insulation material. To keep everything ice-cold, Snake River Farms ships its meat frozen rock solid, along with dry ice to make sure it stays that way.
Product Comparison
I spent over two months testing and reviewing the best mail-order meat. While I also loved (and highly recommend) services like ButcherBox and Good Chop, it was abundantly clear that there’s not a single mail-order meat service that compares to the luxury that is Snake River Farms. This is not a place you order from casually, because everything it sells deserves to be eaten deliberately. Savor every single bite and enjoy each cut to its fullest, whether you’re celebrating a special occasion or simply celebrating yourself. If you’re looking for poultry, be sure to check out the best spots to order chicken online, too.
Final Verdict
If this review hasn’t already made it abundantly clear, the answer to whether or not Snake River Farms is worth the price is a resounding “yes.” Few things in the world manage to exceed the hype surrounding them, and Wagyu beef and Kurobuta pork are two of them. The flavor of Snake River Farms’ meats is otherworldly. You have to taste it to believe it. Snake River Farms offers a wide array of meat and seafood at varying price points, and regardless of your budget, whatever you buy will taste like a splurge.
Where to Order Snake River Farms
 VIA MERCHANT
We Tried It
Snake River Farms
Snake River Farms is committed to delivering high-quality American Wagyu beef and an exceptional experience to your doorstep.
The only way to try Snake River Farms’ American Wagyu beef and Kurobuta pork is to order directly from the company’s website. Prices range from $12 for a one-pound package of Wagyu hot dogs, to $799.99 for a Wagyu Tomakawk Roast.

I’ve tested six meal delivery services, and even I, who has unpacked the boxes of ingredients and prepared the meals with my own two hands, can get them mixed up. The companies are similar, and, as far as I’m concerned, similarly successful at accomplishing their mission: delivering the makings for quality recipes to doors across the country and alleviating the burden of meal planning.
Because of these overlapping goals and audiences, the company names sound, well, kind of the same. There’s HelloFresh, Home Chef, Chefs Plate, Green Chef, Purple Carrot, Blue Apron. Phew! If the “H” companies have you jumbled up, we’re here to explain the differences between Home Chef vs. HelloFresh, two of the more prominent names in the biz.
What’s the Difference Between Home Chef and HelloFresh?
Similarities
Home Chef and HelloFresh have the same model as other meal delivery services for families. They allow you to select plans for different numbers of recipes and servings to receive each week. The insulated cardboard boxes that each company sends contain all the ingredients needed for the chosen recipes, sorted into bags for added convenience.
Even the cost differences are virtually nonexistent. Home Chef meals cost between $9.99 and $11.99, depending on how many you purchase. HelloFresh meals cost between $9.99 and $11.49. (Psst! Keep an eye out for sales.) Note: With Home Chef, you have the option to order six servings per meal, whereas HelloFresh only sells meals with yields of up to four servings.
The recipes are similarly categorized on the website, with labels related to carbohydrate and calorie content, cook/prep time, vegetarian-friendliness and more. Both companies offer roughly 30 recipes to choose from each week. (Need an exclusively vegetarian service? Try Mosaic Foods.)
When trying out Home Chef vs. HelloFresh recipes, each box had its highs and its lows, for a very comparable experience with both brands. For instance, I loved the Italian-Style Wedding Soup from Home Chef but was a little underwhelmed by the Salmon Cakes with Dill Hollandaise. As for HelloFresh, the Street Cart-Style Turkey Bowls wowed while the One-Pan Beef Enchiladas Verdes left a bit to be desired.
In addition to the entrees they provide, HelloFresh (through HelloFresh Market) and Home Chef also allow add-ons to their boxes. Think breakfasts, drinks, side dishes, breads, desserts and a la carte proteins, available for an additional cost.
Lastly, both companies are committed to eco-friendliness and sustainability, exhibited through their sourcing practices and packaging.
Differences
The differences between these two companies in terms of menu options, flexibility and pricing are hard to identify. There are a few additional features of Home Chef, potentially accounting for its slightly elevated price tag, that set it apart from HelloFresh. If you view these features as value-adds, then it could be the fit for you.
Home Chef, owned by Kroger, sells some of its meal kits in supermarkets. This means that to enjoy Home Chef’s offerings, you might not even need to subscribe. Also, if you have a favorite food celebrity, there’s a chance they’ve collaborated with Home Chef. Some examples of partnerships include Rachael Ray and Tieghan Gerard of Half Baked Harvest fame, who developed limited-time recipes for the service. This meal kit also offers oven-ready meals that require little prep before popping in the oven and family meals that automatically come with four servings.
All About Home Chef
Home Chef is based in Chicago, Illinois, and was founded in 2013. Since then, the company has expanded its offerings to include traditional meal kits, as well as optional add-ons like desserts, breakfasts and sides; oven-ready meals; and in-store kits.
Most of its recipes are developed by professional on-staff chefs, though some notable celebrity partnerships mean a selection of the company’s recipes were developed by the famous chef in question. Recipes are dubbed easy, intermediate or expert, and labeled with tags like Keto-Friendly, Gluten-Smart, Vegetarian, Carb-Conscious, etc.
The company boasts its products as “endlessly customizable…meal kits that fit your needs” with “fresh, pre-portioned ingredients.” This customization is made clear via the “Customize It” options, which usually entail swapping out proteins or omitting them altogether.
I thoroughly enjoyed my Home Chef meals, especially the Italian-Style Wedding Soup, and their high-quality ingredients. I found the cook times and difficulty ratings to be accurate. Plus, the comprehensive recipe cards were incredibly helpful. Although I think some of the recipes could’ve been more efficient, my experience was certainly a positive one, and I believe it could be for you, too. Home Chef offerings are suitable for all types of consumers: couples, singles and families.
 VIA MERCHANT
Retailer Comparison
Home Chef
Home Chef, available in select Kroger stores and online, is a celebrity-endorsed, ultra-customizable meal delivery service.
All About HelloFresh
If HelloFresh isn’t beckoning you, perhaps one of the company’s other brands will. The HelloFresh Group, based in Germany, also owns Green Chef, EveryPlate, Factor and Good Chop, among others. Green Chef focuses on healthy, organic recipes while EveryPlate is a budget brand. Factor sells fully prepared frozen meals, and Good Chop is a meat delivery service.
HelloFresh, the group’s namesake, is the most straightforward meal delivery service—and perhaps the original, founded in 2011. You’ve surely heard of it, thanks to its omnipresent marketing, solid reviews and amazing deals.
I’ve tested HelloFresh three times now, and its meals are always tasty, easy and made with ingredients I, myself, would pick out from the supermarket. Think Daisy sour cream, Philadelphia cream cheese, Cholula hot sauce and Colavita olive oil. The comprehensive recipe card makes recipe preparation super simple.
And don’t discount HelloFresh Market, which functions as a more built-out grocery delivery service. There’s even fresh produce available!
Some negligible drawbacks include misquoted prep and cook times and substantial cleanup, but those are small complaints for an overwhelmingly pleasant, ever-consistent experience.
 VIA MERCHANT
Retailer Comparison
HelloFresh
HelloFresh is a fan-favorite meal delivery service celebrated for its diverse menu, customization options and affordability.
The Bottom Line
When it comes to Home Chef vs. HelloFresh, you can’t go wrong here. I’d suggest browsing the menus of both companies and deciding which one entices you more. However, if you’re committed to your weekly supermarket runs or your favorite celebrity chef, then Home Chef might be a better call. Aside from that, the pricing, sustainability practices, recipe selections and ingredient quality are very comparable.