Learn how to proof yeast, knead bread dough and much more in our bread baking guide. We'll also share some of our favorite bread recipes.
Our editors and experts handpick every product we feature. We may earn a commission from your purchases.
Baking bread is one of the most satisfying at-home cooking projects. That freshly baked bread smell alone is worth the effort. Easy bread recipes are the way to go if you’re new to baking bread, and quick breads, made without yeast, are particularly simple to master.
After you learn the basics, we’re sure you’ll be absolutely hooked on making your own bread and the magic that comes with the process. From mixing to kneading to proofing, we’ve got all of the tips and techniques you need to make bakery-quality bread right in your own kitchen—including what to do if you end up with undercooked bread.
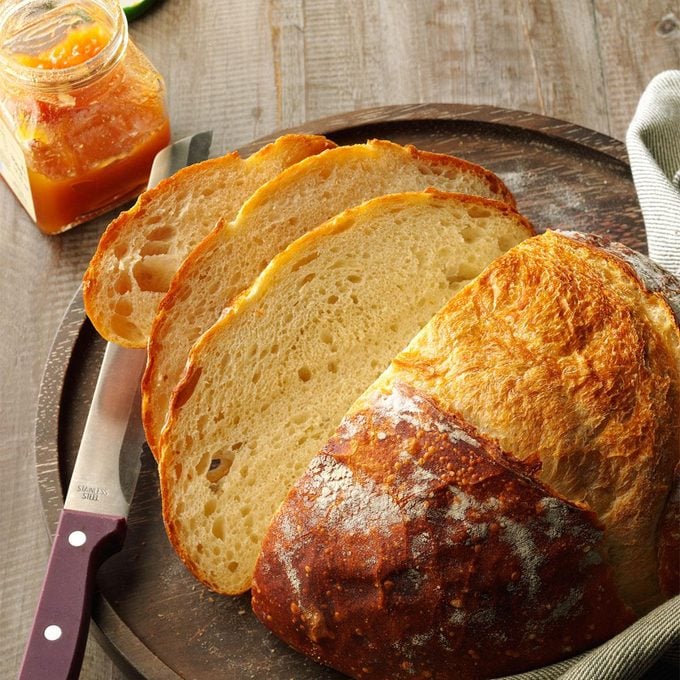
To start your bread baking journey, opt for a simple, straightforward recipe like our top-rated Basic Homemade Bread. It has only a few ingredients, and it’s super versatile—you can slice it for sandwiches, serve it up with soup or toast it for breakfast.
Hey, baker! Come on over to Bakeable, our online baking community,
where you’ll find our best tips and top-rated recipes. Then, share your bakes in our Bakeable Facebook group. We’d love to see ’em.
Ingredients
1 package (1/4 ounce) active dry yeast
2-1/4 cups warm water, about 110ºF
2 tablespoons + 1/2 teaspoon sugar
1 tablespoon salt
2 tablespoons canola oil
6-1/4 to 6-3/4 cups bread flour
Before you move ahead, check this gluten free cornbread recipe which is simplest of all!
Directions
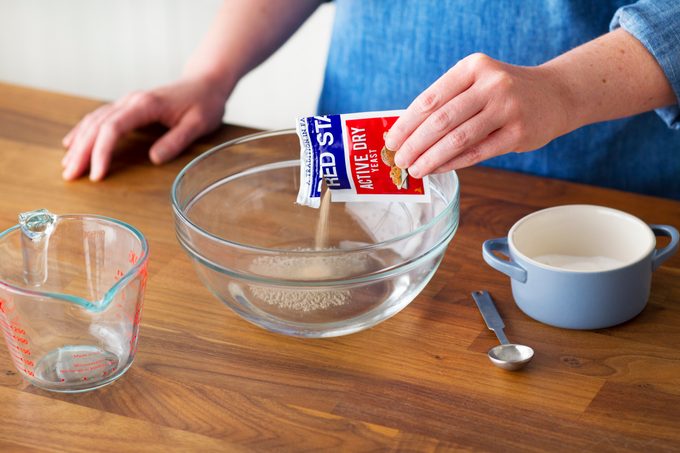
Step 1: Proof the yeast
Before you can get to mixing and kneading, it’s important to proof the yeast. This means ensuring the yeast is still alive and ready to create carbon dioxide, the gas that gives bread its lift.
To proof the yeast, dissolve it in a dish of warm water with 1/2 teaspoon of sugar. You want the water to be around 110º. If you go hotter, you can risk killing the yeast (and then you have to start again). You’ll know the yeast is alive and ready for bread when it starts to bubble and foam.
Step 2: Mix the bread dough
With the proofing taken care of, add canola oil to the yeast mixture.
In another bowl, whisk together half of the flour, as well as the sugar and salt. Add the wet mixture to the dry ingredients and work it into a sticky dough. When the mix comes together, add in the additional flour half a cup at a time until you have a soft bread dough.
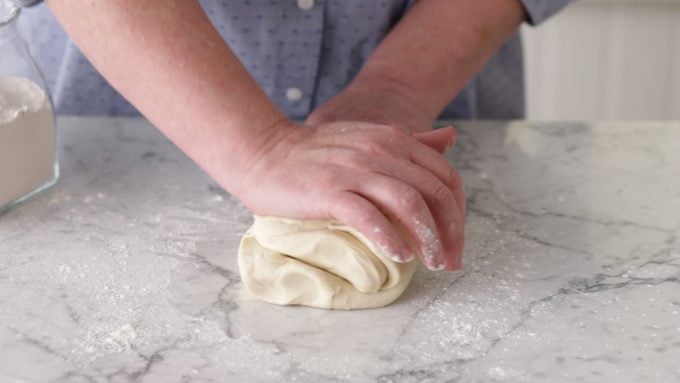
Step 3: Knead the bread dough
Now for the fun part! When your dough is made, turn it out onto a floured surface to knead.
Kneading is the process where you push, pull and stretch the bread. The purpose is to develop gluten. Gluten helps give the bread structure (without it, it would crumble) and gives it that bit of chew we all love.
To knead, take the heel of your hand and push the dough forward to stretch it. Then fold it in on itself, give it a quarter turn and repeat. Knead until your bread dough is stretchy and doesn’t tear when you spread it between your fingers. Kneading times vary, but for this specific loaf, aim for about 10 minutes. Don’t worry about overkneading by hand—you will be tired long before you overwork the dough.
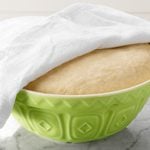
Step 4: Proof the dough
Next, let your bread proof. That means setting the dough aside so the yeast can do its work: creating air bubbles.
To proof the dough, coat it with a touch of oil or cooking spray. Place it in a large container, cover it with a damp towel and let it rest until the dough doubles in size. To get the best proof possible, make sure your kitchen is warm (above 75º) and humid. If it’s a bit chilly or dry, you can try these tips for how to proof bread in different weather conditions.
Step 5: Punch down and proof again
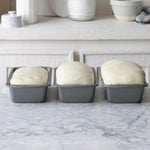
When the bread is doubled in size, punch it down. This just means using your knuckles to press out some of the air inside the dough. After punching the bread down, divide it into two equal portions. Shape and place the dough into greased 9 x 5-inch loaf pans and let it proof a second time, until it doubles. This should take about 60 to 90 minutes.
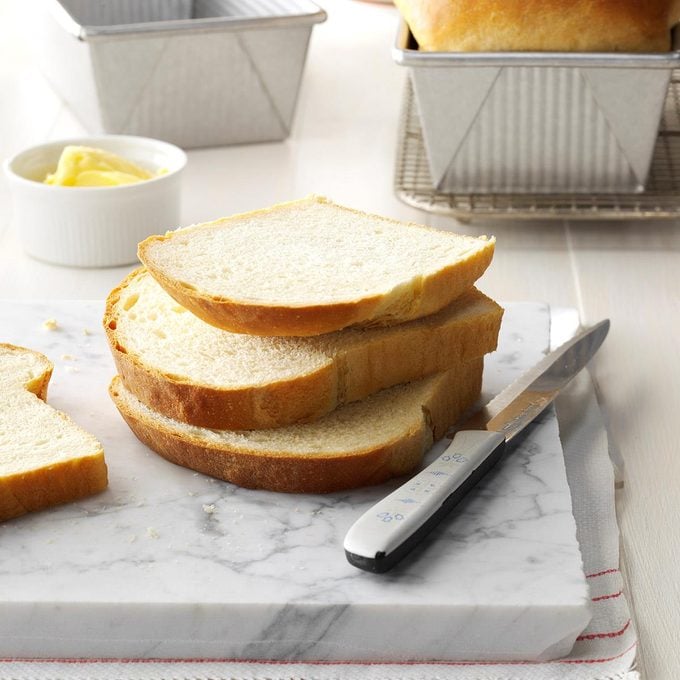
Step 6: Bake and enjoy
When the bread has grown a second time, pop it into a 375º oven and bake for 30 minutes or until the internal temperature reads 200º. Remove the loaves from the pans, and let them cool on wire racks. Then, slice and enjoy!
Once you’ve mastered a basic bread, there are so many more delicious bread recipes to explore. Each recipe falls into one of two main camps: quick bread and yeast bread.
Within those categories, there are seemingly endless possibilities for interesting recipes depending on your preferences and dietary needs.
Restaurant copycat bread recipes: From copycat Red Lobster cheddar bay biscuits to Olive Garden breadsticks, there are so many recipes to replicate your favorite restaurant carbs.
Bread recipes from around the world: No matter where you go, every culture has its own unique bread. Try Indian naan, Korean cream cheese garlic bread or purple Filipino ube bread.
Special diet bread recipes: No matter what kind of diet you’re on—from keto to paleo—there are ways to enjoy the comforting taste of bread. There are plenty of gluten-free bread recipes, too! If you’re looking for something that’s just generally healthy, Ezekiel bread is a popular choice.
Quick breads are made without yeast. They rely on other leavening agents to rise, like baking soda or baking powder. Compared to yeast breads, quick breads are much faster to make. You can stir up the dough, pop it into a pan and bake—no proofing necessary. There are so many easy quick bread recipes, and they often fall into these categories:
Irish soda bread recipes: Unlike most quick bread, soda bread is formed into a round loaf and baked on a tray rather than in a pan. It can be sweet or savory.
Yeast bread recipes are just what they sound like: recipes that call for yeast. They also typically require kneading and proofing, depending on the complexity of the recipe. So many classic bread recipes—like pizza dough, monkey bread and breadsticks—all require yeast. Some of the most popular types of homemade yeast breads include:
Shaped yeast breads: Different from breads made in a loaf pan, shaped yeast breads include rolls, pretzels and braided bread recipes, like challah.
Flatbreads: Despite a name that might imply they don’t rise, some flatbread recipes—including pita bread and naan bread—require yeast.
Sourdough bread: Sourdough bread is unique in that it uses naturally occurring yeast. However, you can use store-bought yeast to make a quick sourdough starter.
Bread Baking Tips
Baking bread takes a bit of time to truly master, but even the trial and error is fun. Plus, who doesn’t love the smell of bread baking in the oven? There are a few techniques you’ll want to brush up on when you dive into a new recipe—particularly when you’re learning how to make yeast bread.
Proofing yeast is a precaution to take before baking any yeast bread. This step, which involves letting the yeast sit in warm water with a touch of sugar, is a way to check that the yeast you’re using is alive and ready to create carbon dioxide, the gas that gives bread all those air bubbles.
Kneading dough is the fun part of bread making! You can work out some of your frustrations while working to develop the gluten in the bread. This gluten development gives the bread structure and the texture you love. To knead bread dough, push it with the heel of your hand, fold it over and turn. Repeat this process until your bread dough reaches the right texture.
Proofing bread dough is perhaps the trickiest part of the bread baking process. To properly proof bread, you need a warm, humid environment. This encourages the yeast to create the carbon dioxide that encourages the dough to expand.
After working so hard to knead and proof your bread, you want to get the perfect bake. For yeast breads, the best way to tell if the bread is done is to take the internal temperature with a quick-read thermometer. According to our Test Kitchen, yeast breads are done when they reach 160º to 185º inside.
For quick breads, you can use the toothpick test, much like you would for cakes. When the toothpick comes out clean, the quick bread is done.
How to Store Homemade Bread
Taste of Home
After taking the time to make homemade bread, the last thing you want is for it to go stale before you finish eating it. Storing bread properly is key. Homemade bread lasts for 3 to 4 days when stored correctly. Bread boxes work exceptionally well for keeping your bakes fresh for a few days. If you can’t finish your bread in a few days’ time, learn how to freeze bread—it’ll last for 3 to 6 months in the freezer.
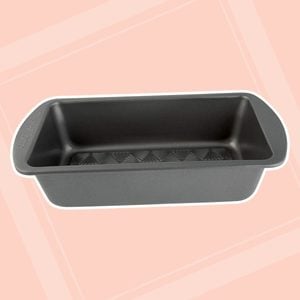
Bread Baking Supplies
You don’t need a lot of extra gear or gadgets to get into bread baking. A quality stand mixer certainly helps, and you’ll definitely need a loaf pan or two, but you don’t need much else to get started.
There are lots of reasons your bread might not be proofing the way you envisioned. The most common issue is that your room just isn’t warm enough. To remedy this situation, crank up the thermostat or pop your bread in a cold oven with a pan of boiling water. If that doesn’t help, check out our list of common reasons your bread isn’t rising.
Your Bread Is Dry
If your bread is dry, then chances are you overbaked it. This means that it stayed in the oven too long or the temperature inside was too hot. Do your best to keep an eye on the time and calibrate your oven’s temperature every so often. It really helps!
Your Bread Is Raw or Chewy in the Middle
In this case, you didn’t bake your bread for long enough. To prevent raw or chewy bread, check your bread’s internal temperature before removing it from the oven to ensure it’s baked.
If you’re still having issues, you may have to calibrate your oven, as mentioned above. You want to be sure that 350º is really 350º.
How Do You Know If Bread Is Kneaded Enough?
The easiest way to tell if your bread is kneaded enough is to conduct what bakers call the “windowpane test.” To do this, stretch a bit of dough between your fingers. If the dough rips, keep kneading. If it stretches to form a translucent window, you’ve developed enough gluten and the bread is ready to proof.
How Do You Know If Bread Is Kneaded Too Much?
Overkneaded dough can produce tough, overly chewy bread. The good news is that it’s nearly impossible to overknead your dough when you knead by hand—you will be tired long before the dough is overworked.
If you’re kneading in your stand mixer with a dough hook, just be sure to pause every few minutes and conduct the windowpane test.
What Happens If You Don’t Let Your Bread Rise Long Enough?
If you don’t allow your bread enough time to rise, it will be dense and chewy when you bake it, so be sure to give it plenty of time to get the lift it needs. You can tell if the bread has risen enough when you poke a knuckle into the dough and the indentation slowly springs back.
What Happens If Your Bread Is Overproofed?
Your bread is overproofed when it looks stretched across the top and when you press it with your fingertip, it springs back instantly. If you bake your bread like this, it’ll crack and collapse. If your bread proofed for too long, just punch it down, knead it briefly and let it proof to the correct size. You can reset the process and still end up with a perfect loaf.
40-Minute Hamburger Buns
Here on our ranch, I cook for three men who love burgers. These fluffy hamburger buns are just right for their big appetites. I also serve this homemade burger buns recipe plain with a meal. —Jessie McKenney, Twodot, Montana
Get Recipe
Oat Dinner RollsThese soft rolls are out of this world. The addition of oat makes them a little heartier than other dinner rolls. —Patricia Rutherford, Winchester, Illinois
Sour Cream Chive BreadThis savory loaf mildly flavored with chives is delicious when served warm with a meal, soup, salad or stew. It also tastes wonderful toasted the next day for breakfast. —Deborah Plank, West Salem, Ohio
Best Dinner RollsThese are the best dinner rolls around. If you can't decide which enticing topping to choose, just use them all.—Christina Pittman, Parkville, Missouri
Easy Onion Crescent RollsHere's a deliciously easy way to dress up a tube of crescent roll dough. These golden bites are one of our favorite recipes—and they're a nice addition to any buffet. We like them so much, I usually triple the recipe. —Barbara Nowakowski, North Tonawanda, New York
Garlic Bubble LoafI tweaked my friend's family recipe for pull-apart rolls, and here's the result. This homemade garlic bread loaf is a must for your next pasta night, when everyone will have fun pulling off each rich and buttery piece. —Lynn Nichols, Bartlett, Nebraska
Grandma's Rosemary Dinner RollsMy grandma (I called her Baba) made these in her coal oven. How she regulated the temperature is beyond me! She always made extra rolls for the neighbors to bake in their own ovens. My mom and aunts would deliver the formed rolls at lunchtime. —Charlotte Hendershot, Hudson, Pennsylvania
Onion French Bread LoavesSince I love variety in my cooking, I tried adding dried minced onion to my usual recipe in attempts to copy a bread I had tasted, creating these two tasty loaves. Using the bread machine on the dough setting is a great timesaver. —Ruth Fueller, Barmstedt, Germany
Best Ever Crescent RollsMy daughter and I have cranked out dozens of these homemade crescent rolls. It’s a real team effort. I cut the dough into pie-shaped wedges; she rolls them up. —Irene Yeh, Mequon, Wisconsin
Wholesome Wheat BreadMy sister and I were in 4-H, and Mom was our breads project leader for years. Because of that early training, fresh homemade bread like this is a staple in my own kitchen.
-Karen Wingate, Coldwater, Kansas
Dilly RollsThese versatile rolls are so welcome served warm alongside any dinner. I always make a big batch since my family enjoys them after they're cool, too, stuffed with a filling like egg salad or ham salad. —Mary Bickel, Terre Haute, Indiana
Arizona CornbreadUnlike other cornbreads, this one uses yeast. With oil and sour cream, this moist, tender loaf has a bit of zip to it from the peppers. —Margaret Pache, Mesa, Arizona
Whole Wheat Potato RollsMy cousin gave me this recipe for classic potato rolls. If you have leftovers or want to make some ahead, go ahead and freeze them—they’ll be just as tasty. —Devon Vickers, Goddard, Kansas
Swiss Cheese BreadThis bread will receive rave reviews, whether you serve it as an appetizer or with a meal. For real convenience, you can make it ahead of time and freeze it! —Karla Boice, Mahtomedi, Minnesota
Icebox RollsI remember my mom making these rolls almost every Saturday so they'd be ready to bake on Sunday for company or someone just dropping by. Although they take a little time to prepare, they're really not all that difficult to make. And there's nothing in the stores that can compare to them! —Jean Fox, Welch, Minnesota
Potato Pan RollsMy family loves these rolls and requests them often. They don't take long to make because you use quick-rise yeast. —Connie Storckman, Evanston, Wyoming
Vegetable & Cheese FocacciaMy family eats this flavorful bread as fast as I can make it. Sometimes I add different herbs, red onion or crumbled bacon. It's one of my best recipes!
—Mary Cass, Baltimore, Maryland
Italian Pinwheel RollsParmesan cheese, garlic and oregano make these rolls hard to resist. My family gets hungry when they smell them baking and can't wait for them to be done. —Patricia FitzGerald, Candor, New York
Amish Potato BreadA tasty mix of whole wheat and all-purpose flour and a small amount of mashed potatoes combine to give this golden bread its wonderful texture. The loaf is very moist and stays that way for days. —Sue Violette, Neillsville, Wisconsin
Best Ever BreadsticksPresent these delicious breadsticks alongside an Italian favorite like lasagna or spaghetti. They're an attractive and edible addition to the table setting! —Carol Wolfer, Lebanon, Oregon
Flaky Butterhorn RollsThe recipe for these dinner rolls, slightly sweet and so very flaky, was my mother’s. They are simple to prepare because kneading skills are not required and the dough is easy to handle. My grandchildren have renamed them "Grandma’s croissants"! —Bernice Smith, Sturgeon Lake, Minnesota
Honey-Squash Dinner RollsPuffy dinner rolls take on rich color when you add squash to the dough. Any squash variety works—I've even used cooked carrots. —Marcia Whitney, Gainesville, Florida
Yogurt Yeast RollsPeople tend to snap up these fluffy, golden rolls, in a hurry whenever I take them to a potluck. It's a nice contribution since rolls are easy to transport, and one batch goes a long way. — Carol Forcum, Marion, Illinois
Rosemary Orange BreadMeet the Cook: Of all the herbs, rosemary is my favorite. This bread goes great with a roast, chicken or pasta with red sauce. It's especially festive to serve at holiday time.
My husband and I have three young children - ages 6, 3 and 1.
-Deidre Fallavollita, Vienna, Virginia
Herbed Bread TwistsA blend of herbs and a special shape dress up ordinary frozen bread dough in this unbelievably easy recipe. —Deb Stapert, Comstock Park, Michigan
Cornmeal Parker House RollsMy mom deserves the credit for making this recipe a family tradition. These sweet, tender rolls have been on every holiday table at her house for as long as I can remember. —Lisa D. Brenner, Harrisburg, Nebraska
Cheddar LoavesSwirls of cheddar cheese give these loaves an exquisite flavor. Try a slice or two for sandwiches, toasted for breakfast or served on the side with a Caesar salad
—Agnes Ward
Stratford, Ontario
Rosemary FlatbreadsMy family loves this as a pizza crust. But with a touch of olive oil and fresh herbs it makes a lovely flatbread appetizer. —Sue Brown, West Bend, Wisconsin
Cheddar Pan RollsThanks to the cheesy dough, these rich cheddar rolls have a gorgeous golden color and fabulous flavor. —Esther Current, Kitchener, Ontario
Oatmeal Dinner RollsThese fluffy rolls go perfectly with any meal. They have a delicious homemade flavor that's irresistible. I like them because they're not hard to make and they bake up nice and high. —Patricia Staudt, Marble Rock, Iowa
Sesame French Bread Homemade French bread isn’t at all difficult to make, and it’s perfect alongside Italian foods. If you’re not serving a large group, freeze one loaf to enjoy later. —Peggy Van Arsdale, Trenton, New Jersey
Butternut Squash RollsWith their cheery yellow color and delicious aroma, these appealing buns will brighten your buffet table. Plus, I've found this recipe is a wonderful way to use up squash from the garden. —Bernice Morris, Marshfield, Missouri
Country White BreadAnytime is the right time for a comforting slice of homemade bread. These loaves are especially nice since the crust stays so tender. This white bread recipe is my husband Nick's favorite. He makes most of the bread at our house. —Joanne Shew Chuk, St. Benedict, Saskatchewan
Soft Buttermilk Dinner RollsWarm, buttery dinner rolls are absolutely irresistible. I save time and use a stand mixer to make my dough. —Jennifer Patterson, Shoshone, Idaho
Whole Wheat French BreadThe first time I made this recipe my husband asked it if was homemade or store-bought. When he reached for a second piece, I knew I had a winning recipe. —Roseann Loker, Colon, Michigan
Golden Honey Pan RollsA cousin in North Carolina gave me the recipe for these delicious honey-glazed rolls. Using my bread machine to make the dough saves me about 2 hours compared to the traditional method. The rich buttery taste of these rolls is so popular with family and friends that I usually make two batches so I have enough! —Sara Wing, Philadelphia, Pennsylvania
Make-Ahead ButterhornsMom loved to make these lightly sweet, golden rolls. They're beautiful and impressive and have a homemade taste that makes them memorable. —Bernice Morris, Marshfield, Missouri
Sour Cream Fan RollsI received this recipe from an email pen pal in Canada. The dough is so easy to work with, and it makes the lightest yeast rolls. I haven't used another white bread recipe since I started making this one.
-Carrie Ormsby, West Jordan, Utah
Sesame Wheat BraidsWhen I started making this bread, my husband and our six children liked it so much that I was baking every day! I was thrilled when the judges at our county fair gave these braids both a blue ribbon and a best of show award! —Nancy Montgomery, Hartville, Ohio
Overnight RollsI'm pleased to share the recipe for these light and tender rolls, which I've made for 25 years. I once served them to a woman who'd been in the restaurant business for half a century. She said they were the best rolls she'd ever tasted.
Herbed Bubble Bread"It takes just five ingredients to dress up a package of frozen rolls to make this buttery, crusty loaf," says Anita Whorton of Powder Springs, Georgia.
Crescent Dinner RollsThese light, golden rolls have a heavenly homemade flavor and aroma. Mom never hesitates to whip up a batch of these from-scratch rolls, since they're a delightful way to round out a meal. —Debra Falkiner, St. Charles, Missouri
Home-Style Yeast BreadEveryone likes the tender texture and slightly sweet taste of this homemade bread. When I'm in the mood to bake, I usually double the recipe and share loaves with friends. The dough also makes lovely rolls.
-Launa Shoemaker, Landrum, South Carolina
Easy Batter RollsThe first thing my guests ask when they come for dinner is if I'm serving these dinner rolls. The buns are so light, airy and delicious—and help make the meal. —Thomasina Brunner, Gloversville, New York
Icebox ButterhornsThese beautiful golden rolls just melt in your mouth! People will be impressed when these appear on your table. —Judy Clark, Elkhart, Indiana
Buttery Bubble BreadHomemade bread can be time-consuming, difficult and tricky to make. But this fun-to-eat monkey bread, baked in a fluted tube pan, is easy and almost foolproof. If I'm serving it for breakfast, I add some cinnamon and drizzle it with icing. —Pat Stevens, Granbury, Texas
Oatmeal RollsMost people tell me what they like best about these rolls is they're so moist. I like them because they're simple to make, freeze well and because I grew up on oatmeal and still love it! —Jeanette Fuehring, Concordia, Missouri
Italian Snack BreadI've served this snack bread alongside spaghetti, as an appetizer and as a main dish. Because it stays so tender, I often bake it a day before. —Joan Nowacki, Pewaukee, Wisconsin
Easy Potato RollsAfter I discovered this recipe, it became a mainstay for me. I make the dough ahead of time when company is coming, and I try to keep some in the refrigerator to bake for our ranch hands. Leftover mashed potatoes are almost sure to go into these rolls. —Jeanette McKinney, Belleview, Missouri
Flavorful Herb BreadThis bread is one of my favorites. It has a wonderful texture and slices beautifully, and the flavor of the herbs really comes through. (Psst—If you don't have a bread machine on hand, learn how to make bread without one!) —Gerri Hamilton, Kingsville, Ontario
Parmesan Garlic BreadsticksThese tender breadsticks fill the kitchen with a tempting aroma when they are baking, and they're wonderful served warm. My family tells me I can't make them too often. —Gaylene Anderson, Sandy, Utah
Garlic Herb Bubble LoafI adapted an old sour cream bread recipe for this deliciously different pull-apart loaf that smells heavenly while baking. It has a light crust, tender interior and lots of herb and butter flavor. We think it's wonderful with a hot bowl of potato soup. —Katie Crill, Priest River, Idaho
English Batter BunsSince receiving this easy-to-prepare recipe from a dear friend, I've made these rolls often for the holidays. —Geraldine West, Ogden, Utah
Crusty Homemade BreadCrackling homemade bread makes an average day extraordinary. Enjoy this beautiful crusty bread recipe as is, or stir in a few favorites like cheese, garlic, herbs and dried fruits. —Megumi Garcia, Milwaukee, Wisconsin
Perfect Dinner RollsThese rolls melt in your mouth. I loved them as a child, and I'm happy to make them for my kids because I know I am creating those same wonderful memories my mom made for me! —Gayleen Grote, Battle View, North Dakota
Butter and Herb LoafThis is one of my family's favorite bread recipes. They love it with a warm bowl of soup during autumn.— Lillian Hatcher, Plainfield, Illinois
French LoavesMy kids love to help me make this delicious bread recipe. It's quite easy, and they enjoy the fact that they can be eating fresh bread in about two hours! —Denise Boutin, Grand Isle, Vermont
Mother's RollsThese golden cloverleaf dinner rolls were one of my mother's specialties. We always looked forward to them on holidays and special occasions. —Patricia Baxter, Great Bend, Kansas
Chive Pinwheel RollsThese light, pleasant-tasting rolls complement almost any entree. With the chive filling swirled through the golden bread, they're attractive enough for special occasions. —Ann Niemela, Ely, Minnesota
Blue-Ribbon Herb RollsThese rolls have been a favorite of ours for nearly 25 years. I even baked them in an old wood stove when we lived on a farm. I developed the recipe using several techniques I learned while studying the art of bread making. The recipe won a blue ribbon at our county fair. —Mary Ann Evans, Tarpon Springs, Florida
Old-World Rye BreadRye and caraway give this bread wonderful flavor, while the surprise ingredient of baking cocoa adds to the rich, dark color. I sometimes stir in a cup each of raisins and walnuts. —Perlene Hoekema, Lynden, Washington
Skillet RollsBaking these rolls in a skillet makes them soft and tender. My family requests them for holiday dinners and other special occasions. I most enjoy them split and spread with butter and black raspberry jelly.
Herbed Accordion Dinner RollsTo dress up everyday dinner rolls, brush herbed butter over the dough, then form accordion rolls. The aroma from the oven is incredible! —Taste of Home Test Kitchen
Focaccia BareseThis focaccia has been in my mom's family for several generations. It is one of my most-requested recipes whenever I am invited to a party—I am not allowed to attend unless I bring it! —Dora Travaglio, Mount Prospect, Illinois
Tender Garlic Cheese BreadsticksGarlic breadsticks complement so many dishes. These tender ones pair well with Italian dishes, salads and soups. —Ann Volner, Maryville, Missouri
Tender Whole Wheat RollsEven though these are whole wheat rolls they have a light texture and are soft and tender. This recipe reminds me of lots of happy meals with my family.—Wilma Orlano, Carroll, Iowa
Garlic Fontina BreadWith its golden brown color and soft texture, this bread is a must at any family meal. It's a modified version of a traditional white bread recipe my brother gave me. Try it as garlic bread toast or for grilled cheese sandwiches — or enjoy it as is. —Cindy Ryan, St. Johns, Michigan
Sage & Gruyere Sourdough BreadA sourdough starter gives loaves extra flavor and helps the rising process. This bread, with sage and Gruyere cheese, comes out so well that I’m thrilled to share it. —Debra Kramer, Boca Raton, Florida
Honey Whole Wheat RollsMost of the farmers in our area grow wheat, so this recipe definitely represents my region. I bake these rolls often, especially when I'm making soup or stew. —Celecia Stoup, Hobart, Oklahoma
Lisa is a former Taste of Home editor and passionate baker. During her tenure, she poured her love of all things sweet (and sometimes savory) into Bakeable, Taste of Home's baking club. Lisa also dedicated her career here to finding and testing the best ingredients, kitchen gear and home products for our Test Kitchen-Preferred program. At home, you'll find her working on embroidery and other crafts.
We are no longer supporting IE (Internet Explorer) as we strive to provide site experiences for browsers that support new web standards and security practices.
 Updated: Dec. 12, 2023